ad

Showing posts with label Hardware and Software. Show all posts

Sunday, April 26, 2020

LIV and Beat Saber mixed reality, setting up

Ever wondered how to make your Beat Saber videos more appealing to your viewers? If yes you might have searched for some videos of what is possible and you found videos of people being shown in the virtual reality. The question is, how is that even possible? Well, there are applications that allow it and today I'll talk about LIV.

LIV is an application that allows for mixed reality capture - meaning that you can put yourself from the real world into the virtual world and then you can either stream it or record via software like OBS or Xsplit. If you don't have the equipment for recording mixed reality you can use an avatar that can be put in the game where you normally stand. LIV can create virtual cameras that can record the avatar in motion. LIV can also be used to enhance first person view because the normal FPV is limited in view and also can make the viewer motion sick. The last feature that I didn't use so I can't comment on it is that you can use a game pad controlled camera while in game, or rather your friend would be controlling it and while you'll playing.

All of these features can make the viewer experience way better and it allows for a better connection between you and the audience. The application is free and is available on Steam. Currently, it only works with Steam titles.

I knew that mixed reality videos were a possibility but I expected that one really needs a green screen studio to record them. NX though told me about LIV and that it can use Kinect or iPhone XR for this without the use of a green screen. He offered to bring it to me so I could try it. I knew that setting that up would take ages but I wasn't ready for how tedious it ended up to be. The following text will talk about how to set up stream looking like the video above. I'll also tackle the difficulties I had to overcome.

For starters, here's the list of what I used in order to record these kind of videos.
  • SteamVR
  • LIV
  • Beat Saber on Steam
  • Kinect
  • Oculus Rift CV1
  • PC - Ryzen 7, Titan X
  • Open Broadcaster Software
  • 2.4 m x 1.6 m space

The minimum requirements are i7 or AMD equivalent and GTX 1070. Note that OBS requires a good processor and GPU as well so running on this setup you may need to lower your resolution or quality settings in order to get it working. Beat Saber is not that demanding when it comes to it but OBS and LIV running at the same time can overload the GPU very fast.
LIV is free to download but you will notice that there is a watermark in the output. If you want to get rid of it head to LIV's Discord channel and fill in a form. They will send you a Steam Key to get rid of the watermark.

Since I played using Oculus software I had to install SteamVR. When launching a game via SteamVR I didn't need to do a room setup, it just worked but later on I found out that the settings were off. If you need to run room setup and you don't see it in the options of SteamVR, look for it under Library on Steam and run it from there (you can also find the executable file on your hard drive to run it).

Then I could download LIV. When you first launch LIV you will need to install a LIV SteamVR driver. You do that by clicking on the button Install in LIV. In order to install it you need to run SteamVR at least once and not having it running during installation. Then you need to restart LIV. Start SteamVR.

Then plug in and install your camera. And set it aside. After that install your preferred streaming software if you don't have it installed already. I use OBS so I will talk about that. I recommend creating a new scene in OBS and adding a Video Capture Device (using the camera you'll use for recording - in my case Kinect) Alternatively you can use the output view in LIV but it's more convenient to use OBS. You should see the camera feed in OBS and then you can find the right spot from which to record so you are whole in the scene. Note that you should have at least 1.6 to 2 m of space in front of the lens.

When you find the right spot click on 'Launch Compositor' in LIV. (Note that in the view of the camera there shouldn't be any shiny objects or anything that reflects light. You might need to use additional lightning sources as well.)

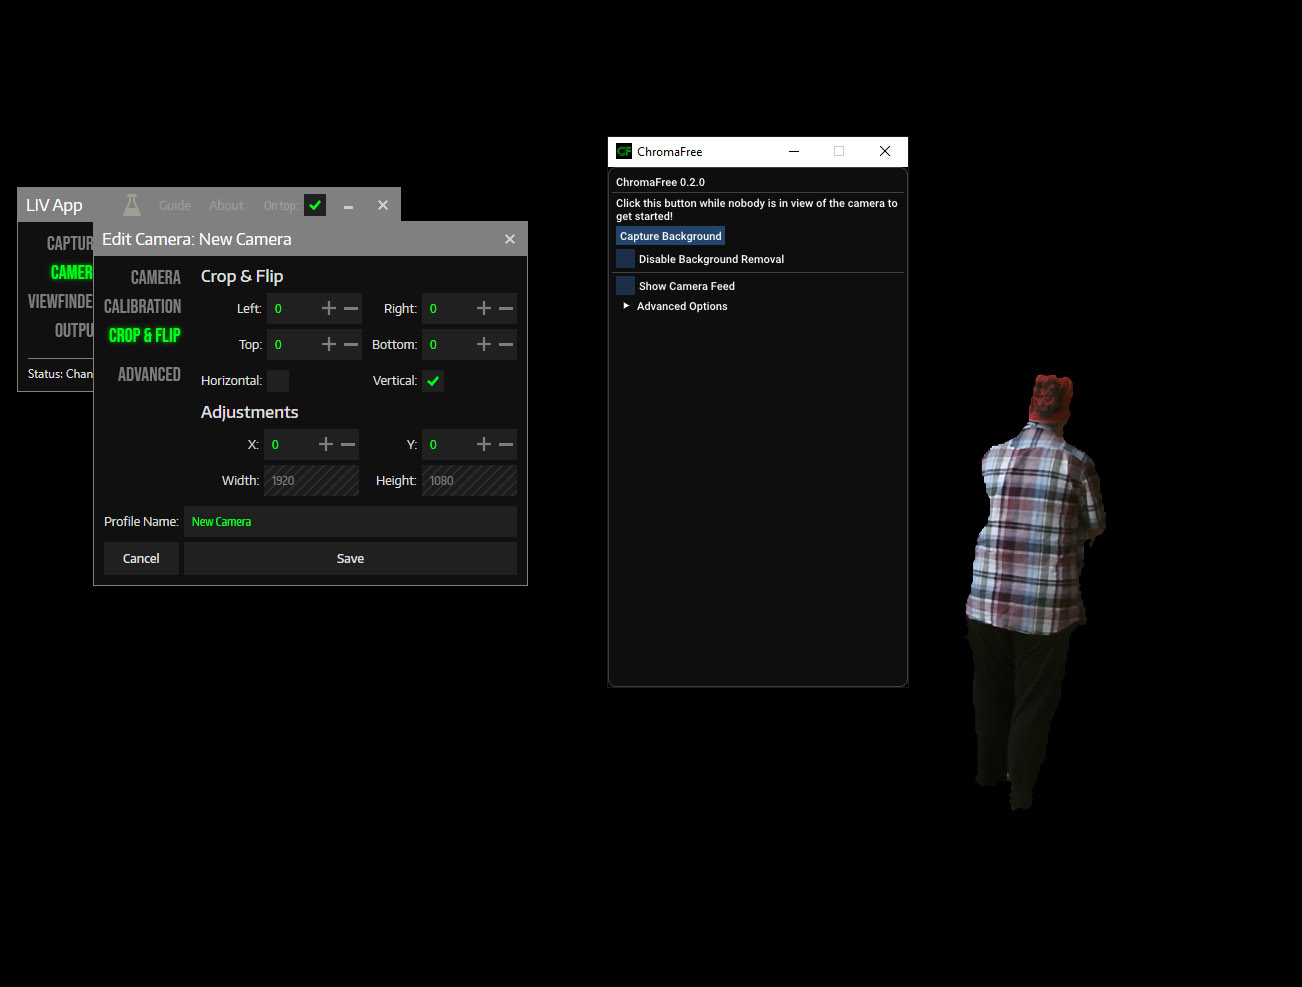
A new window will open. There are four options - Capture, Camera, Viewfinder and Output. Then click on Camera and then on the first button showing a Camera with plus in it. Choose the type of device. I wanted to use Kinect so I chose a physical camera, then in Device I chose Kinect and in mode I had only one available option. You can name it and click on save. If you are using iPhone it may not show up but if you fiddle with LIV for long enough it will eventually show up. (it has to be connected to the same network)

Kinect Camera/ChromaFree seems to have problem with black hair which is why I use the bandana to cover my hair

(You want the Output window shown when setting the camera so open that) Next click on the Edit button (second button). You'll see a new window. It has four options - Camera, Calibration, Crop & Flip, Advanced. If you see your camera output vertically flipped (it is a known bug) go to Crop & Flip and check Vertical. Then head to Calibration. The real fun will begin. Pick a Static tracker and click on Calibration. A VIVR application window will show and you have to press Start Calibration to start the process. The calibration itself takes place in virtual reality so put on your headset and grab your controllers.

Hit the Launch button and press the Trigger. In front of you, you should see a big red cross. That should be at the same place your camera lens is. So move right in front of it so the trigger on your touch controller is right in the middle of the cross and press it. After that a new, smaller cross will appear. Step further away from the camera until LIV shows a distance in green (you should reach the furthest area of your play area). Then align your trigger with the center of the red cross again (you should see that in front of you on the screen). Do the same for the last red cross. You should be as accurate as you can be.

In theory your virtual controllers should match the location of the real world ones. Most probably it won't be the case and you will have to fine tune. Note that I use a very limited space for recording and not ideal conditions for it either and my tuning is pretty way off. After you perform the three clicks come closer to stand in front of the lens of the camera. Hold one of you controllers in the middle of the frame and adjust the position of the camera using the X/Y/Z. The Z controls the depth and that will primarily be used to match the size of the virtual controllers with the real ones.

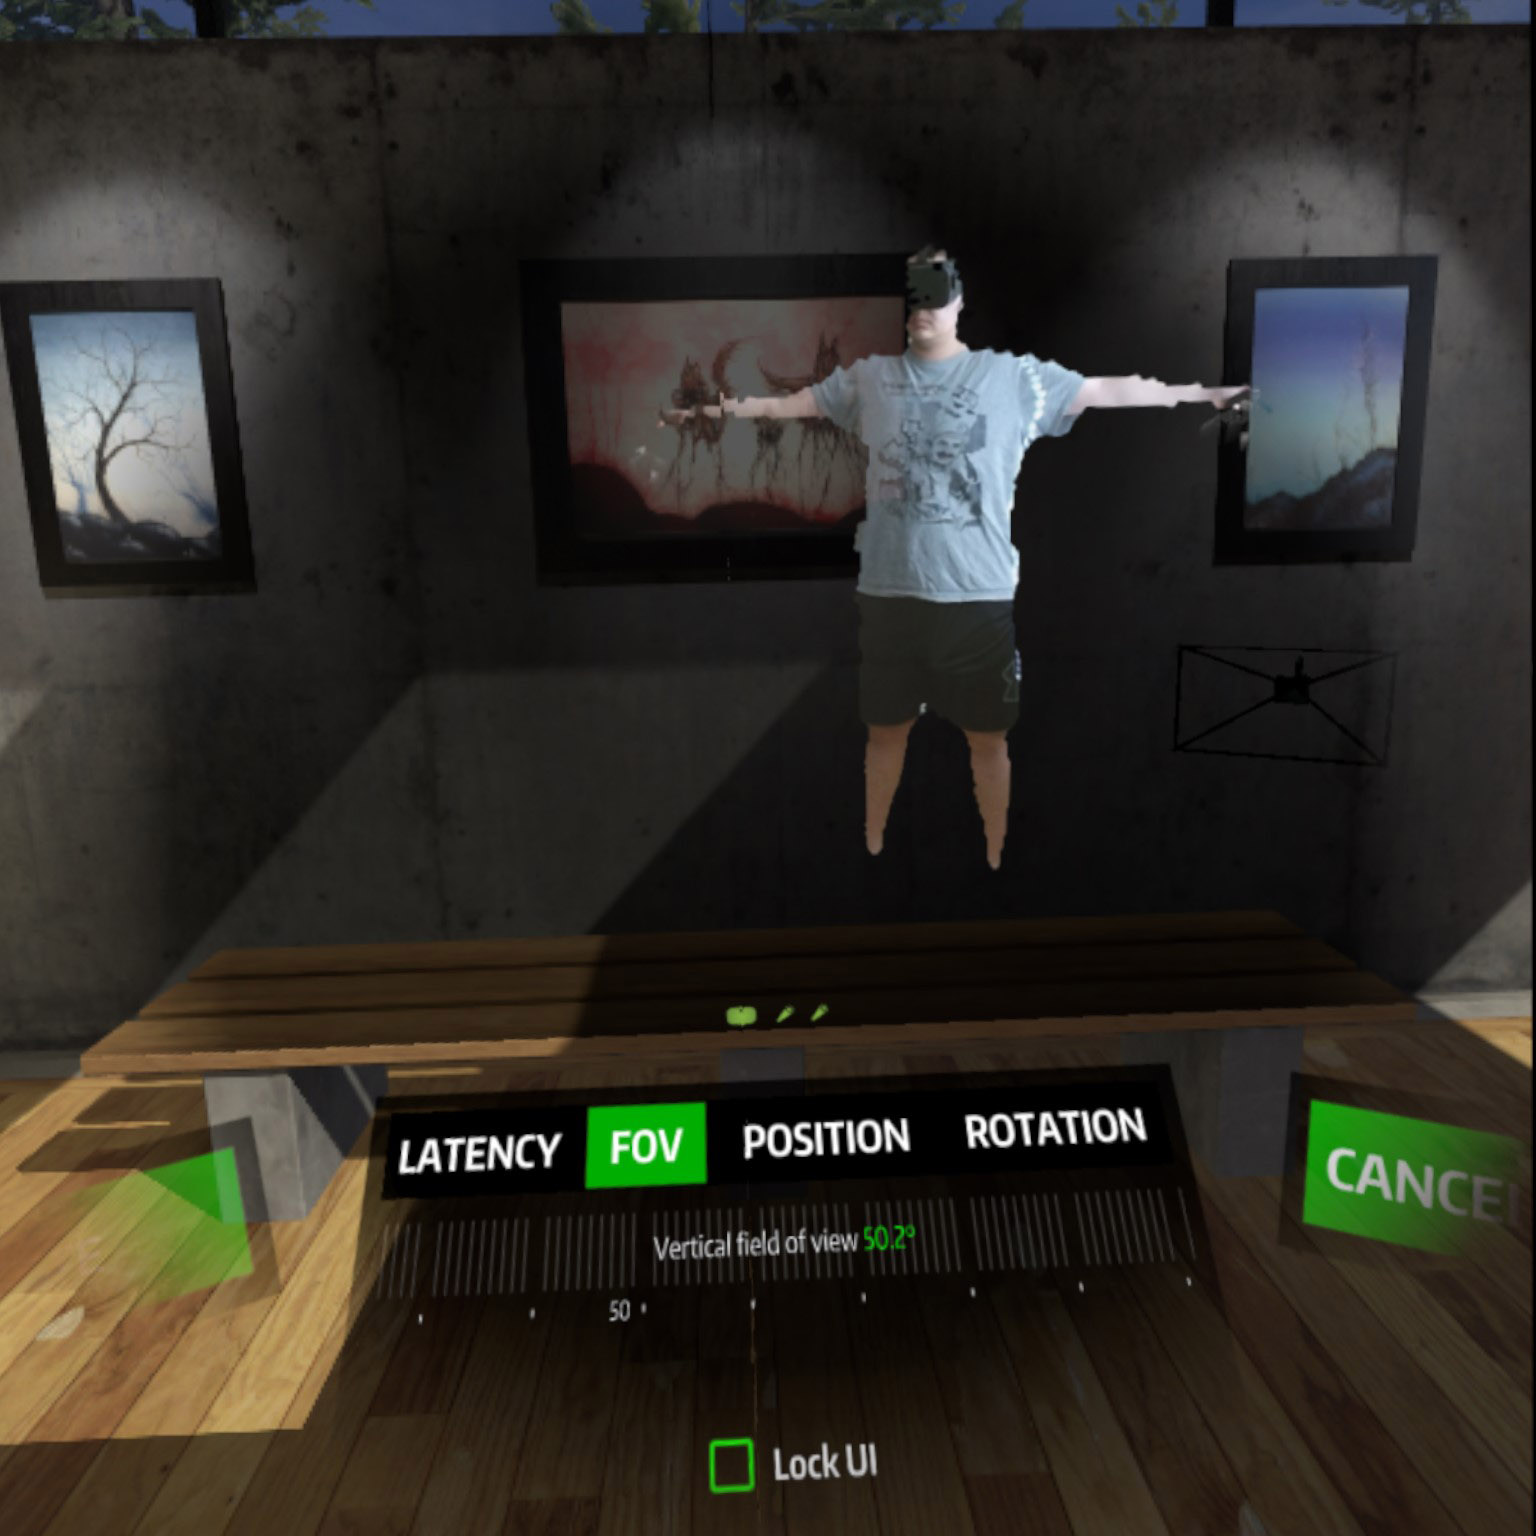
Then step back where you did those two red cross clicks and create a T-pose (arms stretched to the sides). Now you use Pitch to move controllers up or down and Yaw to move them right or left. Get one controller close to the real one as possible.

Then do the T-pose again and see how far or close they are. Adjust FOV to put them where they should be.

After this step close to the lens and do the same.

Then go in the middle and do the same. At this point you can use rotation to finally place the controllers where they should be.

Repeat these steps until you are satisfied (I gave up after 3 hours, you may be more lucky than me).
Now go back to Camera, there you should be able to see Device settings under the Mode. It will open ChromaFree window. Leave your prepared scene and click on Capture Background. The background should disappear from the scene and it should just show black instead. It should also show you if you walk into the camera view. Note that Kinect cameras struggle with black hair.

After your calibration is set you can save it and go to Capture. Choose the game you want to record and click on Sync and Launch. Now the game should load and you should see yourself in the output window.

In OBS, create a new scene and add a Window Capture targeting LIV output window. LIV output is video only so you will have to add an audio source from which Beat Saber is playing. In my case it comes out of Oculus Rift Virtual Audio Device. Since the game runs you should see that being shown in the correct track, so try each one by one if you have more devices you can record from. Then add anything else you may want to use. If you want to capture the FPV you can either capture the monitor view that may be cropped or use OpenVR OBS plugin to do so which captures the whole mirror surface in full resolution.

If you think you are done setting things up you are wrong. First I would advise to play a song and record it to see how the FOV actually looks like (no matter if you see other problems). Just do a test video. Then make a note of all problems you encounter.

So the first one may be that the floor doesn't align with your feet. If you look at my video you'll see that my ankles are under the virtual floor. Fixing this may be tricky. First if you weren't setting anything in SteamVR you can try to set floor in Oculus -> Device Settings under Set Floor Position. You will enter your height there and then stand on designated place and press the trigger twice. The sensors should pick up where the floor is. Relaunch everything, Sync and Launch and see if that helped. Next thing you can try making SteamVR control everything. You have to run room setup first (note that room setup will fail if you have OBS running). If that itself won't solve the problem go to Developer's Settings that are available from the SteamVR menu. Put your HMD on the ground in the middle of your play area and put a hand or foot in the headset to trigger the sensor. Click on Quick Calibration. Relaunch everything and Sync and Launch. If this still didn't help there is a workaround in the camera settings but note that your VR settings may be wrong and may need to be reset. If SteamVR messes things up big time, close it, delete the Chaperone Config file from the SteamVR directory ..Steam/Steammaps/Common/SteamVR and launch SteamVR again. You will have to do room setup again then. As for the workaround. In LIV, under Edit Camera and Crop & Flip, there is Adjustment. Move the Y higher or lower depending on whether you stand above or under the floor. After you set the height right you will have to go through the whole calibration process described above again.

The second problem might be that you don't see enough or you see too much in the camera view. That can be adjusted by using FOV Override under the Calibration tab in LIV. In my case I use 70 degrees. If you don't record the full body you shouldn't be touching this because the image will be cropped if the value is too high and you won't see much if it's going to be too low (the higher the FOV the higher load on your CPU so if it won't run smoothly try lower the FOV value).
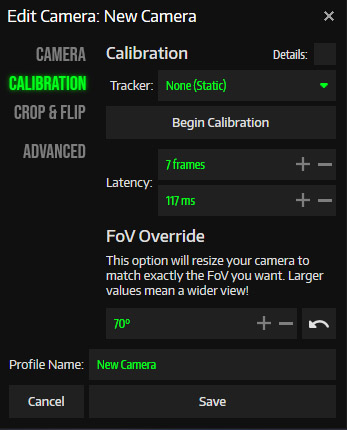
When you are satisfied there are two other things you can take care off. Audio and Video will both have a lag so you may want to set a delay for the VR capture. The VR video Latency should be set and you can input it in LIV under Calibration. For the Kinect camera it's probably around 7-9 frames. To find the value you can set NoFail in Beat Saber let a song play out and just swing your saber and follow your arm movement (or rather the other way round). For audio, you can calculate it after you figure out the video delay. The formula for it is audioLatencyAdjustment = (1000 / outputFPS) x frames. You get a value in ms and that should be added to your audio track in OBS. It can be set via Advanced Audio Options.

If you set both latency more or less right the sabers should follow your arm motion and the sound shouldn't be way too off. This also depends on how fast you move. With my test moves it worked quite ok but when I tried playing songs on Expert, Faster song and Expert+ I found out that my settings are not quite right so you may find yourself playing with that for a while as well.

After you are done setting everything you may want to enable Viewfinder. This will show the output video in virtual reality where your camera lens is. So if you look that way you will know your viewers will be able to see your face (and you will see the output).

OBS Settings
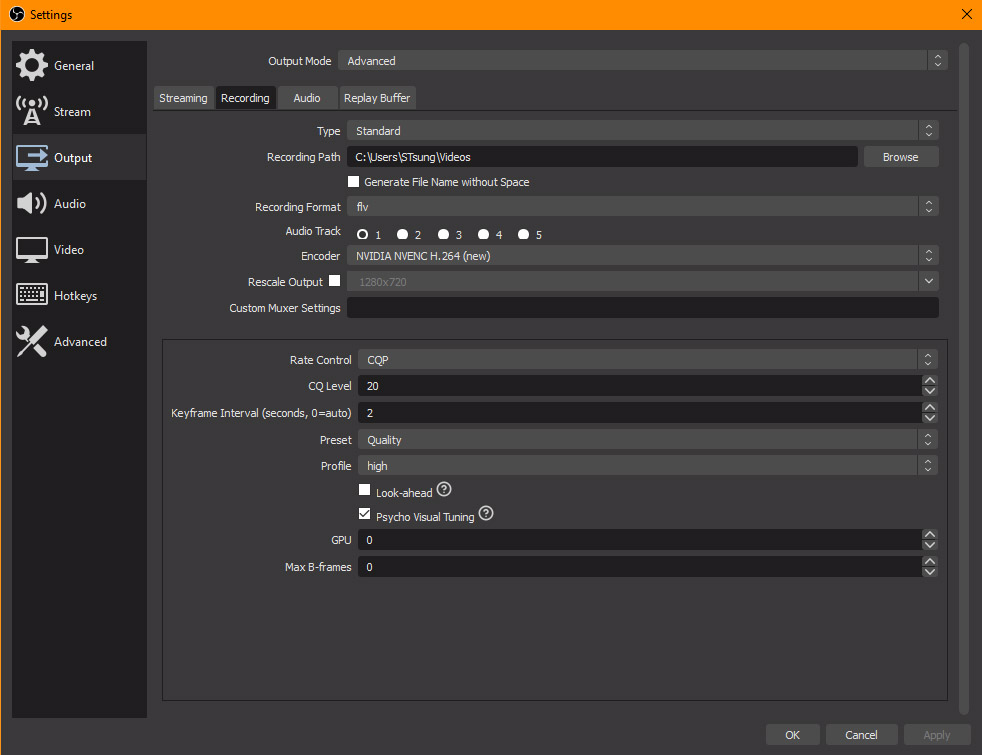
These settings should be fine when using GTX 1070

I didn't speak about Output settings because that is something you will have to find out for yourself as it will depend on your system configuration. I will now write about OBS settings a bit so you have an idea what can work if you have GTX 1070 or better graphics card.

My upload speed is 10Mbps which means that I can normally stream at 1080p60 at 6000 Kbps Bitrate. Ryzen 7 and Titan X are very capable of it but when it comes to high motion and two to three very demanding inputs using the GPU it may not work out and it actually didn't for me. For that I had to lower the resolution to 1280x720 (I set that both in LIV and OBS so it wouldn't try to rescale by some accident or anything).

If you don't have a version higher than OBS 23.0 and you have a newer card download it. It uses new NVENC (which may not perform well if you have GTX 1070) which uses the GPU in some more efficient way. For streaming I use (if not using an avatar, use NVENC when using an avatar) - Output of 1280x720, 60 FPS, x264 encoder, CBR 6000 bitrate (twitch limits it for me to 3500), 0 keyframe interval, CPU usage Very Fast, Profile High. For recording I use new NVENC, CQP 16, Keyframe Interval 2, Preset Max Quality (2-pass encoding), Profile High, Psycho Visual Tuning turned on, Look Ahead turned off, GPU 0, Max B-Frames 0.

If your dedicated video memory is lower you can use 1-pass encoding (Quality) and lower the quality to something between CQP 20-23. If your graphics card is not good enough you'll have to be cutting on resolution and FPS but if it comes down to that your computer is most probably not VR ready so you shouldn't probably run into that problem.

Getting your settings in OBS right is not the only thing that can clog the performance. There are few things you can do when it comes to OBS. First turn Game Mode On in Windows if you haven't already. Next see if Game DVR is running. That can be found under Gaming Settings. Turn Game DVR off - Turn off the Game Bar and then go to Captures and turn off Background Recording. If you can't find these settings you can use local group policy editor to disable it or disable it in RegEdit.

Set OBS to run as Admin. Find the OBS executable, right click to go to Properties ->Compatibility Settings, check Run this program as Administrator.

If you still have some problems launch Beat Saber and go to Player settings. Check Reduce Debris and check Static Lights. If this still won't help then you may need to change the graphics settings of Beat Saber (lowering the rendering and antialiasing values) either in the game itself or in SteamVR (lowering the rendering resolution).

This sums up the process of what you need to do in order to stream and record a mixed reality output. If you don't have access to Kinect or iPhone XR you can use any webcam recognized by LIV. I used PS3 Eye Camera to try it out at first. In this case you need a green screen or another kind of one color screen. The process for setting that up is the say with the exception that it won't launch ChromaFree but another window that is used for keying where you can get rid of the background as well. Note that no matter what camera you use the background unless you have the very same light conditions and green screen conditions will have to be reset with each launch of LIV. Kinect camera will also vertically flip upon each LIV launch. If you change any setting and change it back it will revert to the settings you set previously.

If you don't have access to a camera you can always use a virtual camera and use an avatar instead. There are already some avatars in the LIV app but you can download more, for example from https://bsaber.com/avatars/ or https://modelsaber.com/Avatars/?pc. Or you can create some in VRoid Studio for example. If you want to use an avatar, in LIV, you should click on add camera button. There you pick Avatar. A new VIVR Avatar window will open. In that you can drop avatar files. Then you can Sync and Launch and pick an Avatar in game (through the green LIV dot somewhere on the floor). There you will have to do a T-pose to overlay it with you and you are set. You may need to change your camera settings but otherwise no more tedious calibration is needed (all the problems with floor and such apply here too though).

Hopefully this post will help you set up your stream
Thank you for reading
S'Tsung (stsungjp @ Twitter)

Tuesday, April 7, 2020

Etterna Online server

Long time ago someone added me to a Czech and Slovak gaming group on Facebook. It's like 70% toxicity and 30% of an actual content of varied quality so I don't usually check it that often. Today though I saw someone playing some crazy chord jack-y song on what seemed to be a Stepmania 5 build. In the zillion of comments underneath I found out that the game is named 'Etterna'. I searched for it and found the Etterna Online website.

Here you can download a SM5 Etterna build, create a profile on the website and gain access to many song packs including 'normal' and keyboard charts. Then you just play, your scores are saved on the server and you can check your standing in the leaderboards. Well, you get the idea.

At first I just downloaded old song packs that we used to play at conventions but then I thought why not give the Etterna ranking a try. I downloaded more song packs, mostly those that had anything BEMANI in the name, and tried some songs. At first I got totally lost on my dance pad and I was unable to sync. There was also something that bugged me but I couldn't quite figure out what it was. It was also making my accuracy go haywire. During this time I recorded some songs via OBS because I thought I'd share few songs so people could see that you can use legs to play 4 panel. Just after that I gave Etterna a bit more thought. I started to look for cell noteskin and after copying to the game I realized what was throwing me off - the note hit animation. The default noteskin in Etterna might actually have some animation but it's almost unnoticeable. Also the colors of that noteskin were messing with my head. When I saw a note that was supposed to be purple it was green! So glad I changed the noteskin. I set my settings to C730, mini 50%, Distant and all was fine. More or less. I'd appreciate a higher speed mod but unfortunately my monitor didn't seem to like higher speed than that.

Anyway here's the video I recorded using my iphone and OBS. Unfortunately I can't seem to figure out how to get record a good video

After playing probably way too much than my body could handle I decided to see if I could possibly play on the keyboard. I just tried the same settings I had for normal play and upped the speed to 750 BPM. I could read the charts more or less but my fingers were kind of puzzled about what to do when seeing certain patterns. I practically failed some tens. Ok, I didn't fail them but my score was around 60% which was unacceptable. I can get way higher score with my legs!

After few more failed attempts at trying to play on the keyboard I realized that I could possibly be playing Beatmania IIDX and clearing tens with 60% instead of this. I didn't switch to IIDX but went back to the noteskins. I downloaded IIDX Empress noteskin and put in my noteskin folder. I set Reverse, Overhead and hit enter on the same song I played before. Suddenly my score went into 90.xx! I struggled with the noteskin a bit for a while and it took me few songs to figure out where the problem was. I was in Perfect window rather than in Marvelous one. I realized that the red target line is not actually where one should be confirming the notes but rather below it on the key graphic. But otherwise I realized that with these settings I can be better at clearing songs on a keyboard. Nonetheless, my legs are still better at accuracy and speed. Here's a video of me playing Destiny, a 10 (not sure what the difficulty is)? The SDVX Station I pack is awesome.

After playing more songs requiring me to do hell a lot of jacks I decided to hook up my SVSE5 controller and try playing 4 panel on it. This time around the game itself started lagging so it even became difficult to record. But when not having OBS recording my game session the client runs fine and I could play eve harder songs than on keyboard.

Monday, April 6, 2020

PS3 Eye, iPhone used as webcam, iVCam and OBS Virtual Camera

During quarantine we are stuck home and it's up to us to figure out how to have some fun. Paper Magic players can't go to their local game stores to play face to face and that is why some decided to try Magic over Skype or other service like Whereby or Hangouts. I wanted to give it a try as well but I had to overcome certain technical difficulties. The thing is, I do not own a webcam. I have an integrated webcam in my notebook but it is not sufficient for paper Magic nor anything where the camera needs to track movement. Since I am a rhythm game player and sometimes record videos of me playing I needed a 60 FPS camera. I didn't want to spend too much money on a webcam and I was recommended using PS3 Eye camera which can under some conditions work under Windows.

PS3 Eye
The camera records at 640x480 and 60 FPS and does quite a good job for just few bucks. It worked just fine for what I bought it for so I decided to give it a try for recording Magic as well. The problem is that PS3 Eye is a Sony Playstation product and was not intended for use in Windows (Win10 in my case) and that is why programs like Skype do not recognize the camera (note, rather it stopped working with a certain Windows 10 update. Under Windows 7, it seems to work just fine and probably will work with older version of Win10 as well).

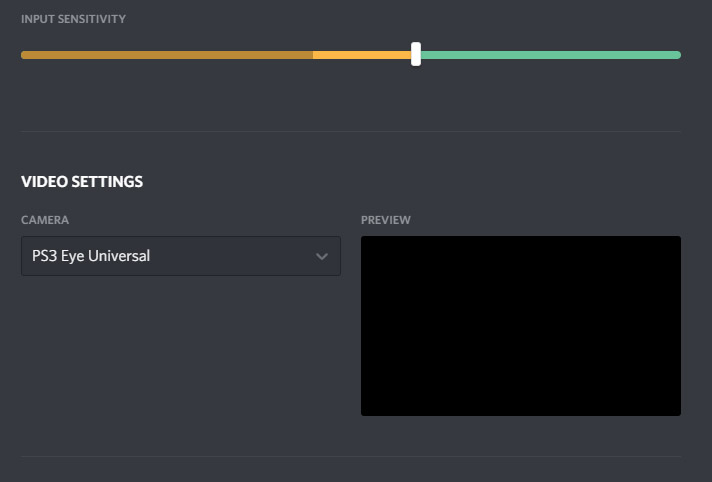
If you want to get the camera working there are several drivers you can get, some are actually free. The best place to check what is available is PSMoveService at GitHub. In the past I had a hard time finding something that would actually work and so I ended up with a CL Eye Driver. The driver though didn't enable the camera for all applications and even exposing the camera as a DirectShow object didn't help. I could see the camera option on Discord (and other software) but it simply didn't 'initiate'. The microphone though works everywhere without a problem and is actually better than the integrated one in my ROG Strix G series notebook.

Since I was unable to make it work I started looking for other alternatives (note, that in the end I made it work thanks to OBS Virtual Cam (read below))

iVCam
Finding an alternative without buying a webcam seemed bleak but that was probably just me not thinking in today's technological terms. It dawned on me just after one of the Magic players said he used his iPhone as a webcam. Yes, we live in a time where everyone has smartphones that are connected to the internet and can record high definition videos. While I have not so old iphone I pretty much use it as an alarm clock, camera and occasionally as a telephone. So the idea of using it as a webcam did not come to my mind. There are several apps that allow you to this. I was recommended iVCam and after reading reviews of other available apps this seemed as the winner. I decided to give it a try after reading what it can possibly do. It sounded like a dream. I doubted it would work as many things requiring Apple device to connect to Windows PC don't really work that great.

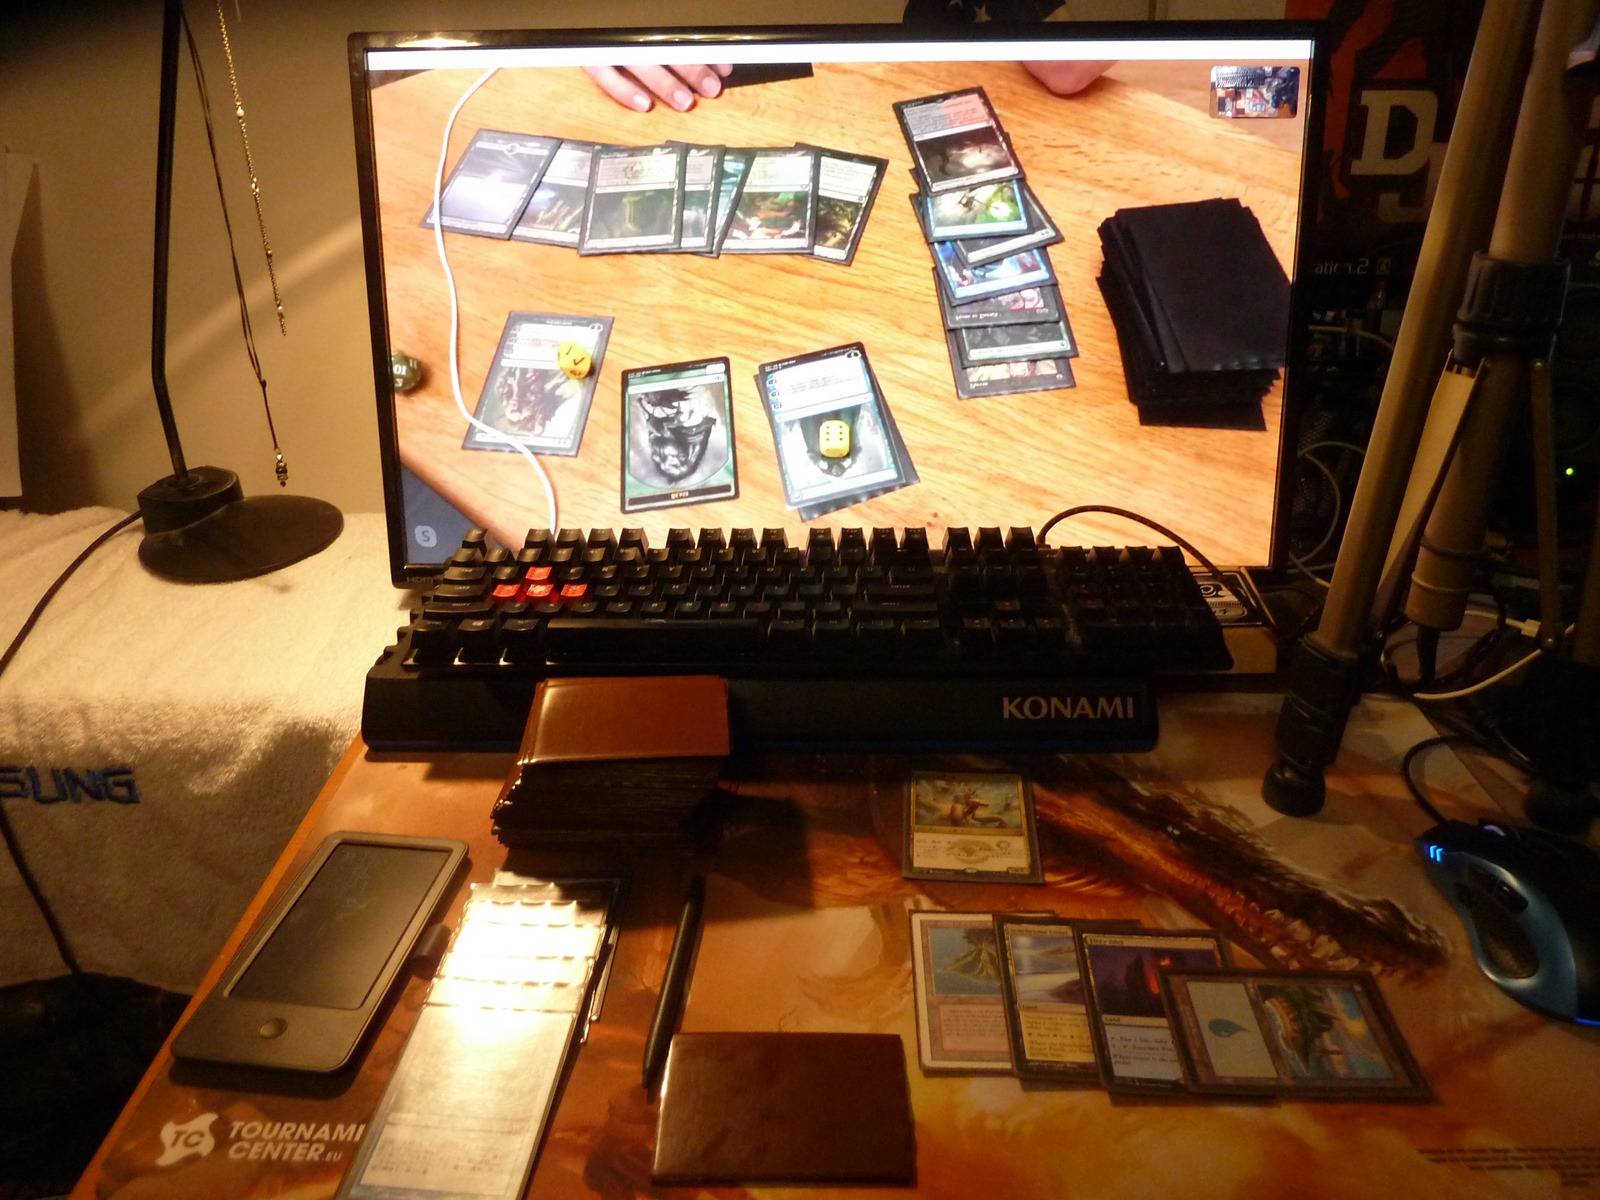
I downloaded the trial version and tried making it work. The automatic connection didn't work over wi-fi for some reason (I can connect to my phone via wi-fi normally in other apps for both upload/download, I have UDP open and even turning NOD32 off didn't help). As for USB it didn't want to connect either but then I was told that I should have itunes open in order for it to work (it's possible that the Apple Application Support service can run without iTunes open). When I launched iTunes and got like 10 error messages it actually started working (for a second). After swearing because of my silly Apple lightning cable not working most of the time and my computer not recognizing the USB Device I finally got it working. The tricky part just awaited me - placing the iPhone from where it could record. Here's a photo for those interested, not an ideal setup but it worked.

After I managed to place my camera on the tripod without making it fall off it I played with the settings a bit. I learned it can record in FullHD or even 4k and that it can record even at higher frame rate than 60. I set it to FullHD and 60 FPS and checked the output video from OBS. It was superb. I decided to buy this app and use it. I think that there's a high probability of me wanting to use this in the future. After I bought it I started running into more problems that may or not be linked with my computer/software or iphone and its lightning cable.

I wanted to give it a try and play some games of Magic. I joined Hangouts call and found out that my feed was mirrored or flipped. After playing against the player who suggested the software and seeing his feed mirrored as well I came to the conclusion that it's the software's feature. I didn't understand why this was happening but fortunately there is a simple solution to it. The iVCam itself has various settings that can be set - exposure, ISO, auto focus (disabling this is a good thing as it seems for some phones), auto white balance, which camera you want to use, mirror or flip image. If you click on mirror it should fix the feed for Skype etc. The not so great thing is that most probably some programs won't be getting the mirrored image but the one you see in the iVCam preview. For example as I mentioned earlier the feed from OBS was perfect, when you hit on mirror it will be correct when you use it in Chrome or Skype but it will be flipped in OBS. In order to fix this I flipped it in OBS and keep it mirrored in iVCam so I get the correct image feed everywhere.

The second problem I ran into was re-initializing the feed. When my phone disconnects apart from 'Device not recognized' error I also get a Attempt to Host Timed Out error on the iVCam app. I tried closing both applications and starting them again just to see the same error. Re-plugging the iPhone didn't help either. In the end I found out that when closing iVCam it does not actually stop it from running. The app has to be killed manually and then relaunched. The phone needs to be re-plugged to my dismay because that leads to 'Device not recognized' error. It looks like a vicious cycle and it takes a while to get sorted out but it will eventually work again. Time is of essence when you are playing Magic tournament and have a limit for the round. Nonetheless I was able to finish my games in time even with running into problems during each round. I seriously hope that I'm the only one with these issues and if not, well just note that it will take some time tinkering with this.

Later we played a Magic event on Discord and I found out that even though the iVCam is seen as a source it gives me the same black screen as the PS3 Eye camera. Since I got pretty upset about this whole thing I tried to figure out how to make it work in Discord in between rounds. After a minute of googling for some random keywords I encountered a video labeled 'Your stream setup over Discord'. While I hate watching video tutorials and videos in general I clicked on it because I was curious and I also expected this could make my camera work somehow (see OBS can see all my devices properly). It was about using OBS Virtual Cam and I'm glad I learned about it.

OBS Virtual Cam
The OBS Virtual Cam is exactly what the name says. It allows one to use whatever you set up on OBS to be seen as a camera feed in other software. It can be downloaded from its GitHub page. You either download the installer and hope it does what it is supposed to or you copy the contents of the zip file into your OBS folder. Then you register it as a direct show source. Run CMD as Administrator (hit win key, write CMD, right-click the cmd and run as Admin) type something similar to this regsvr32 "C:\Program Files\obs-studio32\bin\32bit\obs-virtualsource.dll" (write the correct location of obs-virtualsource.dll on your machine). Do this for the 64bit dll as well.

When you have done all this you can run OBS and click on your already setup scene. Then all you need to do is navigate to Tools and click on the Virtual Cam. There you hit start and close the window. Now your stream setup can be seen anywhere! You set the target camera as source, in my case OBS-Camera.

So in the end buying iVCam was not necessary since I could have just used OBS Virtual Cam but I don't regret buying it because it does allow me to use my iPhone as a very good video recorder or webcam and I'm sure I'll put it in a good use from time to time. Hope this post will help some other people running into the same issues as me.

Thank you for reading
Ren

Tuesday, October 13, 2015

SCGMobile (Magic: The Gathering App)

EDIT: Unfortunately this app will be discontinued by the end of this month.

Since my phone got stolen and I was given iPhone for Christmas I was searching for an app that I could use as a card database for Magic: The Gathering containing oracle text and containing magic rules and IPG. On my Android device I used MTGFamiliar which seemed the best app I could find and it probably is the best one (I also tried quite a few). The MTGFamiliar though does not seem to exist on iOS. So I looked for something similar for iOS.

The AppStore showed me about 258 results so I tried the relevant ones one by one and I couldn't find one that would be good even as a life counter (which I'm not really interested in but I use from time to time). After a while I gave up and just downloaded MTGRules and was looking up the cards online.

Some time later at one major tournament though I needed really something. I asked around and I was finally redirected to StarCityGames and their SCGMobile. I downloaded it, opened it and to my surprise found an application that suits my needs (mostly). It does not contain any rules but contains more stuff a player and SCG follower needs.

So what does the app feature?

    The application works in two modes - online and offline.

    The application lets the user read SCG articles both normal and premium and it allows the user to favorite them. This way one does not need to search through all the content to find something.

    It also has access to the store (which I don't really need but I guess it can be handy).

    Then there is the Life Management that pretty much does everything one could think of. You can set your name, your opponent's, track the win rate of games and matches, there is commander damage, poison counters, dice roll (available from the life management screen), timer and mana counters (also available from this screen). The stuff bolded is something I find quite important because when someone uses this kind of application he or she does not usually have dice around. The timer makes it easier to track the time which I find good as well. Even when not playing in tournaments this comes handy because one can find out if he or she plays fast enough to win on time.

    Next thing in the menu is Advanced Card Search. The normal search is a part of the menu so it is accessible after one tap. The advanced search is pretty much what it says. The result will show you the card's image, oracle text and its price.
    I would like to make one note here. The Advanced Search screen also has a Update Card Database button (I was looking for a way how to update it for quite some time...till I googled that and landed on SCG's comment about that). The application does not update itself so one needs to manually update it. For that login is necessary (I have SCG account for ages and it worked). The app allows to create an account if you don't have it.

    Dice and Coin is pretty much what it says. It has a history of rolls and flips.

    Mana Counter - let's the user to count mana in mana pool both color, colorless and there is also a counter for storm. (many apps don't have this for some reason)

    Hotlist - when one looks for a oracle text he or she can add the card to a hotlist. The most searched cards can be put there and accessed more quickly. I guess you can use that Hot list for whatever you want but this is the only thing I came up with. I always have to explain what my general does (The Mimeoplasm) even though I hardly cast it. So that's why it is on the list.

    About - if you want to know who brought this app to us and who wrote it. Thank you guys!

So if you have an iOS device and you have a need for Card Database and a Life Counter I would recommend this application even though updating manually is not something I would expect from such an application. This isn't the only 'bad feature' but everything is something one can live with. After going through many of free apps I just couldn't choose one that would do what I want and would look at least decent even if they update automatically when a new set comes out. That is the reason why this app should get a good rating.

Anyway I hope this post saves time to some of you who would be downloading one app at a time and figuring out if it is a good one or not. SCGMobile does way more than I expected, looks ok, is fast and does not crash (many of these apps were just crashing).

Note: Some people want a deckbuilder along with card database (and that is why some people rate this app badly for some reason). This application does not have it so if you are looking for something like that you'll have to look elsewhere.
(the manual update is an issue but come on guys, you have to do this 4 times a year! that is not a reason to give this app 1/5.)

Friday, October 9, 2015

Streaming via Open Broadcaster Software

Believe it or not streaming is not something new. It's been here for a while. In 1995 Microsoft came with ActiveMovie which allowed streaming media in a really strange video format. It continued in Windows Media Player. Apple also had to come up with something similar and so they introduced streaming in QuickTime 4. During those times RealPlayer also allowed streaming. So watching something or viewing the downloaded stream needed us to have the respective codecs and players installed. The Windows Media Player allowed us to choose our own settings for our streams and often rendered the stream unviewable for many. RealVideo seemed to work fine though. It was the only thing that managed to stay 'playable' even after a new version was out. Few years later (2002) Adobe Flash happened and since then we could truly speak about unified streaming that everyone could view.

Since technology advances fast we are now in a totally different world of streaming now. It has become something very common and something that an ordinary consumer can do.

Nowadays in the era of interactive media, streaming has become a huge thing - many people earn a lot of money by streaming. That does not mean that you have to be one of those people, but one day streaming is something you might want to do, no matter for what reason.

In most cases in order to stream we need software that can make this happen (encoder software). Gamers in general have been doing this for ages and do not have problems setting everything up. For those of you who struggle with it I wrote this short article. It is an overview of what is possible in one specific and free software.

Open Broadcaster Software

In order to start streaming one needs equipment (computer, microphone, monitors, lights if need be etc) and software. It seems to me that majority of serious streamers use Open Broadcaster Software or its Multiplatform version now being named Open Broadcaster Studio.

Since I wanted to stream and record my own videos I decided to give this program a try. It is free and can be downloaded at http://obsproject.com. At first I wasn't sure how good this program can possibly be but it far surpassed my expectations. It can simply stream what you have on your screen but it can do way more. You add text, images, overlays, video camera feed etc to your stream. You can also switch from one scene to another. It can become a TV studio practically. In order to have bigger control over your stream it is good to have a second monitor.

Note that you can simply use Open Broadcaster Software as a screen capture software. You do not need to go live.

After the software is downloaded it needs to be set up and for that you can read the documentation at the aforementioned site. If you are using Windows Vista or Windows 7 and want to use Window/Screen/Monitor capture you will have to disable aero (Win8 and win10 cannot disable aero) or OBS won't be able to stream/record at all. If you will use Game Capture leave it on. You can either disable aero yourself in Windows or check 'Disable Aero' in OBS under Settings -> Video.

So how one sets the scene? You can start by adding a scene and naming it. Then you need to add 'sources' which you want to show on your stream. In my case there is sts_channel pane that hides practically the windows taskbar (this can be just cut from the view), chat pane that hides Magic Online chat if I don't want to show Twitch chat instead, webcam feed and monitor/display capture. You can add way more to your scene if you wish and many things can be set via OBS (opacity, size, color etc). For example players show their record, logos of their sponsors etc. on their streams.

To change the size and position of sources on your scene you need to see a preview of your stream or actually stream. You then just click on the source you want to edit and then use your mouse to either resize it or move it (In Open Broadcaster Software you need to click on 'Edit Scene' first). Right-clicking the source will show a menu that can help you set other things (for example if you want to set your webcam's exposure/contrast etc.).

To actually stream Magic Online games you will have to go to Monitor Capture and check "Capture Layered Windows" otherwise OBS won't see the game window (but only Main Navigation window).

Also note that Window and Monitor Capture won't let you stream games in full screen mode. Only Game Capture can do that but this mode can be unstable. With Monitor capture you can stream only a sub-region of your screen.

The order of your sources is important. Think of it as layers. If your screen capture will be the top most object you won't see any of the objects that are beneath.

You can hide any source/object any time you want. You can switch audio streams, change their volume, set push-to-talk and push-to-mute etc. Audio should be set before you start to stream (my microphone input is set to relatively high - 76% - and Magic Online is set to minimum otherwise it is the only thing that can be heard). You need to set to what devices OBS will listen. You can choose those in Settings -> Audio. If it won't show set your device to default in Windows and keep the Default option in OBS. I also have set push-to-mute if by a chance someone rushes in my room and starts talking to me. It comes handy.

I have set another scene that I sometimes switch to if I need to do something on my computer in between rounds and I'm not entertaining my viewers. It is simply an image that says that I'm 'in between rounds' and not really present. So after I finish my match I can just switch to the scene not worrying about the fact that people would see what I do on my computer.

As another example here is another scene I created and can use. I wanted to do some interviews from time to time and for that I created a scene that contains 2 video feeds, background image and text. (the text can be changed while streaming, the same way as anything else)

When you have your scenes ready you need to set your encoder settings. For me x264, flv, 3000 bitrate (use constant bit rate) works fine so see what works for you (the recommended value is 70-80% of your upload speed). Count with 3500 bitrate as the maximum. 3000-3500 bitrate is recommended for 1080p streams. For lower resolutions lower the bitrate (for example for 720p, 1800-2500 should do). So set the resolution and bitrate accordingly.

The older version is not saving your replays unless you tell the program to do so automatically (check 'save to file', otherwise you can always do that manually). You can also set replay buffer that allows you to save the last X seconds of your stream (you need to set a hot key for that obviously^_^).

Then you have to set up your stream. I use Twitch, so I needed to fetch my stream key from Twitch (https://www.twitch.tv/[you username]/dashboard), select the closest server and I was ready to go. If you want to use Youtube you will have to log in to Youtube, go to Creator Studio, click on Live Stream and under Encoder Stream get your Stream Key.

Twitch can automatically upload your videos to Youtube where they stay (on twitch they are deleted after 2 months or so) after your session is done. But if you would like to do it yourself and edit your videos or just trim them or change the audio or whatever I recommend using VirtualDub with mp4 or flv plugin depending on what container you will set in OBS.

So that was in short little bit about Open Broadcaster Software. It is really awesome software. The best one I encountered. So have fun streaming!

Here's one game to show you that the software works and the link will take you to Youtube Gaming which I find pretty cool (it is far from perfect but is getting better). The live streaming finally works fine and has a good quality. So people don't need to be afraid to use it and if Google makes it even better (so it can be edited for example via YT Gaming etc it might actually become pretty good). But so far it is Twitch being no 1.

Tuesday, August 25, 2015

Garmin Vivofit

Vivofit is a smart pedometer bracelet that tracks your daily steps, distance, calories burned and heart rate for more or less one month (then the data gets deleted, one needs to upload the data before this happens). It has a rubber wrist band that is durable and water resistant. Vivofit's battery should last for a year and that is one of the reasons why I chose this product in the first place. Many other pedometers need to be recharged once a week and I really hate charging any device.

As for accuracy I don't really have means to test it but I used Garmin GPS system to track the distance and counted the number of steps based on the average length of my step. There was only a very slight difference. I tried walking three different distances and with (heavy bag or a big heavy box) or without anything in my hand (wearing the bracelet) the result was the same. This wasn't the case though when I ran. (I moved less distance according to Vivofit).

Vivofit also sets a daily goal for you. This is actually quite a nice feature. Based on your average daily steps it will adjust the goal. I set my own goal around 7km per day. My goal on the device ranges from 9800 steps (when my activity suddenly drops a lot) to 12000 steps (when it gets higher). At the time when I was looking for such a device one had to manually set the goal and this one allowed automatic setting. This automatic goal setting allows the wearer to be progressively more active. (or at least in theory^_^)

Other feature that seemed handy for me at first is an inactivity bar. It has several stages. After first 2 hours of inactivity first bar appears. After after 15 minutes another bar shows up. To get rid of the red bars one just need to get up and move actively for about a minute (if the bar is all red). The bar does not fill while asleep.

The last feature I did not mention is sleep monitoring. Vivofit records your movement during sleep and distuinguishes light sleep stages from deep sleep stages and it also shows when one awakens. (this fairly works, when I was waking up I wrote down the time and then checked what the bracelet recorded). By browsing the data from this I found out that before major tournaments in Magic (or any other event that seems to put pressure on me) I do not enter the deep sleep state. I used to be awake the whole night before such events. Now I fall asleep. When I wake up though I do not feel refreshed or anything, just completely dead and feeling the same way I used to when not sleeping at all. This is most probably due to the fact that I do not enter the deep sleep stage during which the body regenerates. I also noticed that while lucid dreaming I wake up at the end of deep sleep stage. When I fall asleep again I go immediately to deep sleep again and the dream continues (unless I get up from the bed and then go back to sleep, in that case the sleep cycle starts at the beginning - light sleep). When I wake from a dream I'm fully awake and aware unlike when I wake up not remembering dreaming prior waking up. That's when I'm dizzy and my head aches and it takes time to adjust to 'being awake'.

Vivofit uses Garmin Connect to sync data and show them. The application works on Android and iOS devices. Synchronization via PC proved to be a bit complicated (but that might be due to the fact that Garmin Connect wasn't working the way it was supposed to in January and February). I only use iOS app now (it takes a while - a day sometimes - to see all the data from the pedometer for some reason, it either does not show on Garmin Connect site or in the app...that's why you don't see the Sleep data on the screenshot below).

I did not really talk about calories much. The reason is that the calories that it shows probably do not correspond to reality. It shows the non-active calories (basal metabolic rate) well I guess based on ones weight etc. but as for the active calories burned I have no idea. It probably shows more burned calories if one moves faster but after playing Pump it Up or ITG for two hours the calories hardly moved from the 1900 to 2100 I usually get. In that case the machine itself would tell me that I burned something in between 1500 and 2000 calories. Workouts can be added manually via Garmin Connect. This will add the calories burned (that who knows how are set). Anyway the only thing I managed to figure out out of the calories is this - when I reach over 2100 calories I'm hungry the next day. The day after it is back to normal unless I'm physically active once again.

Overal I like this device, it suits my needs and helps me monitor my activity and this way I can hopefully get a better sleep and keep myself active (and monitor my weight, which is a rather depressing thing to see^_^).

Wednesday, March 26, 2014

Zepp sensor for Golf

Today we went to visit a local driving range and I had the chance to see how Zepp Golf works. It consists of a software and a sensor (dual accelerometers and 3-axis gyroscope) that measures speed and movement. The software analyzes your swing not only in written form but also it shows graphically in form of an animation. You can see the backswing, club plane or hand plane. All this you can see from any angle you want (you can rotate the model of you by sliding your finger in one or another direction).

In order to make this work you need to connect the sensor (that you put on your glove) with your device be it iphone, ipad or android device and then set the application. You can set your name, age etc but also your goals. Then you just set a club you are going to use and you are ready to go. Then you swing and after you hear a beep the data is stored on the device. If you have the device in your pocket it will also measure rotation of your hips.

You can view your swings individually or see average of your session (bellow is screenshot of one of my swings). It shows overall score, Club Speed, Club Plane, Hand Plane, Tempo, Back Swing, Hand Speed and Hips. Follows the description of the metrics from the application.

Club Speed
For golf professionals, a typical driver clubhead speed is 110-115 mph (177-185 kph) and for women professionals, it’s 90-100 mph (145-161 kph). Most "average" golfers don't approach those speeds. A typical recreational male is swinging somewhere in the neighborhood of 85 mph (137 kph), while a typical amateur female golfer is about 65 mph (105 kph).

Club Plane
This measures how closely your backswing plane matches your downswing plane. Ideally, the higher the percentage, the better the golf swing.
Most professionals are at 90-100 percent matching. Amateurs have a much harder time matching the backswing to the downswing. Most have a downswing that comes “over” the plane, causing a steep downswing and a ball flight that slices.

Hand Plane
Hand Plane Comparison measures the path your hands make in the backswing compared to the path they make on the downswing. Ideally, the higher the percentage, the better the golf swing.
Hand Plane Comparison is important because the club head will follow where the hands go. Most professionals are at 90 -100 percent matching. Amateurs have a much harder time matching hand path. The majority have a hand path that comes “over” the plane causing a steep downswing and a ball flight that goes right.

Tempo
Tempo is the ratio of the measured time in seconds it takes to make a back swing versus the measured rate of time in seconds it takes to make a downswing until impact. Tempo is the natural rhythm and timing of the swing. You want your swing to not only happen in a timely manner but in a consistent way with every swing.
A golf professional’s average time for the backswing is 0.82 seconds, with an additional 0.27 seconds to make the down swing to impact. That is an ideal ratio of 3:1. Most amateurs get into trouble with inconsistent changing tempo from swing to swing. Usually your downswing time in the Tempo screen is consistently the same. It’s your backswing time that is the culprit, changing from swing to swing.
I have problems with going up with club...

Backswing
This is the measurement of degrees of the angle of the club shaft between address and the top of backswing. It is measured by the change in angle at address to the angle at the top of the swing. At address the club is at zero (0) degrees. At the top of the swing it is 270 degrees.
I need to work on this^^

Hand Speed
This is a measure in miles per hour (MPH) or kilometers per hour (KPH) of how fast your hands are traveling at the point it impacts the golf ball.
For golf professionals, a typical hand speed is 24-26 mph and for women professionals, it’s 18-20 mph. Most "average" golfers don't approach those speeds. A typical recreational male is swinging somewhere in the neighborhood of 16-17 mph, while a typical amateur female golfer is about 13- 14 mph.

Speed certainly is not my problem...

Hips
Hip Rotation measures the degrees you rotate your hips on the backswing and then the degrees of rotation at impact. The reason why Hip Rotation is important is because that is where most of the power in a golf swing comes from.
The average golf professional has an average hip rotation of 45 degrees closed to the target at the top of the backswing, and at impact, they rotate their hips to an average of 42 degrees open (facing the target). Most amateurs, under rotate their hips on both the backswing and the downswing.

Overall this gadget looks like a good thing. At least for those who are capable of using the data to improve. I know now what I do wrong by just seeing the numbers. Even though the animation shows a lot (not that much in my case). If this is worth 150USD that's up to you, but in my opinion this is something that can really help and improve your game.

Monday, April 30, 2012

Ascension the Game port for iOS

My post about the game - if you don't know it already

I read on Facebook that I can get this game for 0.99USD so I grabbed an iPad and tried to buy it via the Apple Store. I have to admit that there was a slight problem with getting it. I don't know why but it was always redirecting me to itunes instead of being downloaded right away. After few minutes of trying to download (as it was already payed for) it I was finally rewarded with 'Ascension Downloaded' message.

I played a game and tried to see how it works. I was difficult for me at first to see and realize what my opponent bought as the animation was too fast for me. When it was my turn I played my cards and bought a card. I wanted to beat cultist, but I wasn't awarded a VP. Later I found out that I have to either drag the card to Void or tap on 'defeat'.

The interface is nice, but it took me a while to figure out that I have to activate my constructs and that I need to be dragging cards to the right places (my deck, discard and void). But I guess Apple product users are used to this. I'm not. Anyway it looks awesome and Round counter is good.

I encountered one problem though. Sometimes I got a wrong number of Honor points when there were two sources giving you VPs (I had Voidthirster in play). Also when leaving the game all the settings you set are reset for some reason. Online play is more like playing by mail, so I discarded this idea at all. I think that the game could use some chat window. It's at least something I miss and talking to my opponents is something I usually need. It happened to me many times while playing Magic that I needed to say something.

On game screen there is 'play all' button which will put all the cards 'on stack' and resolve them. It's good when your hand looks like 'mystic, apprentice, apprentice, militia, militia'. It just counts the runes and power for you and you can see what you can buy - it is highlighted in green. When there is something you have to do or choose a target it will let you go through it step by step (if you are banishing from two different areas for example) which is nice, but well in such games it is necessary. What is not mandatory and has the 'may' in its wording you have to do yourself and it won't be reminding you. ^^

Rating: 4.5/5

Monday, October 31, 2011

Cockatrice

I've been hearing and seeing this name on Magic forums and Facebook I did not really know much about it until recently when I played few games over it. So what is Cockatrice?
Cockatrice is an open-source multiplatform software for playing card games, such as Magic: The Gathering, over a network. It is fully client-server based to prevent any kind of cheating, though it supports single-player games without a network interface as well. Both client and server are written in Qt 4.[cockatrice.de]
I used Apprentice years ago then switched over to Magic Workstation. I abandoned that software because I encounter a lot of people that behave really bad or they think that they know the game. Anyway MWS is not bad and I thought it well done. But I have to say that I had many issues with installing new sets, exporting database and loading newly created decks into MWS Online Play.

Cockatrice is a alternative to MWS. It is really easy to install. You just download it and run it. It will install the software and then run Oracle which is the game's database. To update with new set you just have to run the Oracle and it will do the work for you. The images are downloaded either on the fly as you play the card or you can download it at once (or use your MWS images).

Deck Editor
You can create a new deck in the deck editor or load an old one - which can be either in the software's format or any text type one, it loads MWS files as well (.dec, .mwDeck). The deck editor is fast and creating your deck is pretty easy. And there is no blue and green arrow as in MWS. You can entirely use your keyboard. Type a name, highlight the card you want with the arrows and hit enter how many times you need the card. This has allowed me to create my EDH decklist in a really short time and that was a big plus for me.

When you have a card highlighted in your decklist using + or - you can change the card count.

Shortcuts
If you've ever used MWS then you already majority of the shortcuts. This has allowed me to play via Cockatrice and do not look as a complete idiot.

CTRL + I will do a roll for you
CTRL + M will draw your seven cards and mulligan
CTRL + U will untap your permanents
CTRL + D will draw a card
CTRL + E will draw cards
CTRL + T will create tokens
CTRL + A will attach a card
CTRL + S will shuffle your deck
CTRL + W will show you the top card of your library
CTRL + Space will proceed to next phase/step (or you can use the function keys F5-F10
CTRL + L will let you set life total
CTRL + J will create a copy of a token that is already in play

F2 will concede a game letting you to start a new one in the current session
F3 will show your library that can be sorted in several ways (alphabetically, by type...helps a lot even though at first it was rather confusing to me)
F4 will show your graveyard.
F11/F12 changes life total.

That's what comes to my mind when trying to remember some shortcuts. If you right click a certain zone you'll get more options or you can access it via the game menu.

Targeting is done by holding the right button and moving the cursor towards the target.

Play
Once you have your deck you can connect to a server or start a local game. Everything is free and works wonderfully. You can play 1-on-1 game or a multiplayer game. You can let spectators watch you play and talk in the chat (or disallow it). This allows for judges of online tournaments to be there. This seems as a really good feature and will make tournament play possible. There are different kind of league tournaments played via Cockatrice (for example Win a Dual Highlander Series).


When you start a game, you have several green, blue and red part on the screen. They are your hand, battlefield and stack respectively. I didn't know about the stack until my opponent was placing cards there and that showed in the text/chat window. It sure is helpful if you actually use it (I gotta start to do that). Other elements on the screen are player name, avatar, life total, library, cards in hand, graveyard, RFG zone, turn structure, mana pool + storm count, card description and the chat window.

The software is colorful, but it is fast, efficient and well done. Check it out.
The player base is low for the time being but I think many more people will start to play on cockatrice server.

BTW you can download it from http://cockatrice.de/ (not anymore so go to -> http://www.woogerworks.com/