
Beat Saber guide - How to create a full body tracking avatar
This guide was written for the use with CustomAvatar mod version 5.2 and higher. This mod requires you to compile your avatar into .avatar. I use a VRM model as an example which does not mean that this is a VRM to .avatar guide, it's just an example. All you need is a 3d model you can import into Blender.
If you have a VRM file then you might also want to check Virtual Motion Capture/VMC Avatar or LIV first since both software use VRM files and use blendshapes and dynamic bones (springbones in VRM). If you want to use it with customavatar follow this guide then.
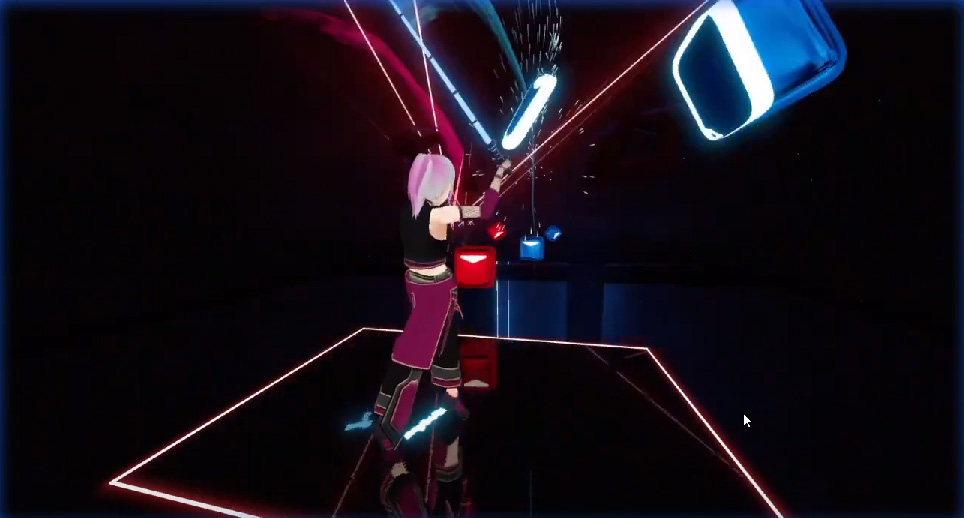
| My avatar in-game and me slashing some flying cubes! | Here's a FBT avatar video tutorial |
In order to use an avatar with CustomAvatar plugin you need your avatar in a specific format - .avatar. You can't simply convert a VRM into .avatar though so in this guide I'll show you what needs to be done in order to get .avatar ready for full body tracking. You can have your avatar in another format but it needs to be importable into Blender or be a fbx that you can directly import to Unity. I use VRM avatars so I'll be using that as an example. Your avatar can be in any format you can import to Blender be it .fbx the most common one or .pmx which comes from MikuMikuDance.
Blender
What you need is program named Blender. You can download it from https://www.blender.org/download/. Then you will also need CATS Blender plugin which will do all the work needed. Make sure to download the correct version depending on your version of Blender. The plugin can be downloaded from https://github.com/michaeldegroot/cats-blender-plugin/releases.

Launch Blender and navigate to Edit -> Preferences. Click on Istall button and find the zip archive you just downloaded. Install it. After the plugin is tested it will show in the plugin list, active (ticked). Now if you go to File -> Import, you should be able to see a new import option for .vrm (or you can click on Import in the CATS plugin).
If you don't see the option to import your model's format look for a plugin that allows you to do that. For example for VRM there exists a VRM Importer plugin
Delete the three objects in the scene since you won't need them (just select them with your mouse and hit delete) and import your previously exported VRM model.

You should be able to see your model but with an armature that looks broken. Access the CATS blender plugin. Press N and then find CATS tab and click on it. Click on Fix model. The model should show textures and you should be able to see correctly looking bones.
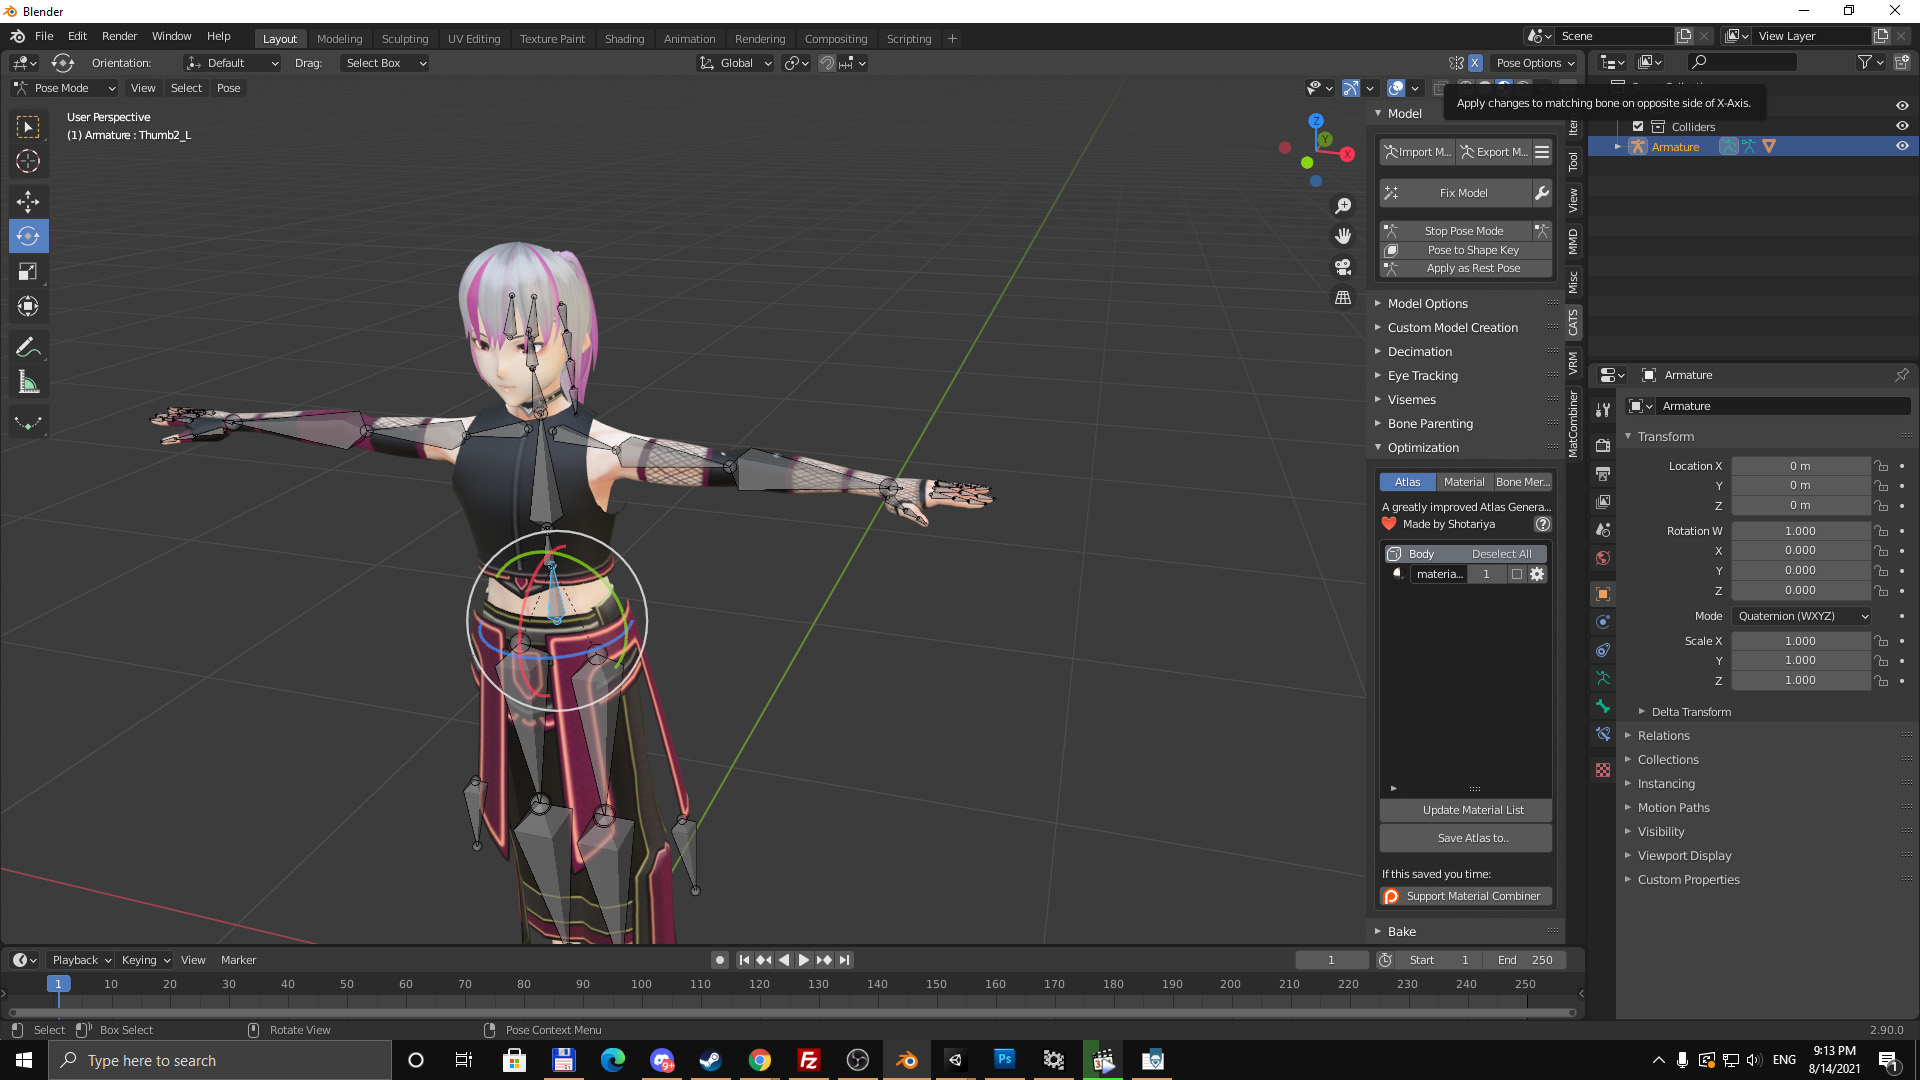
At this point you can export the model, but if you want your avatar to actually hold the sabers in game you should Start pose mode and create closed fists. Rotate bones on one of the avatars hands. What I do is tick the x-axis option under options to work on both hands at once. If you forget to do that, simply select the bones you rotated, CTRL+C. Then select the same bones on the other hand and press CTRL+SHIFT+V. After you create closed fists (note that the fingers should be closed around imaginary saber) you can save pose to a shape key. Then Clear all transformation (right-click the view) and Stop the pose mode (both of these are in the CATS plugin tab). The shape keys can be accessed in Unity by clicking on your prefab's body in the hierarchy window under Skinned mesh renderer in the inspector. (If you are creating an avatar for VRChat you can go to Eye tracking and Visemes and create more shape keys if you want your avatar to be able to blink, have eyes tracked and be able to lip sync. You need to choose closed eye visemes for the eyes and choose 3 corresponding mouth visemes (A, O and CH) out of which 15 will be generated).
If the avatar is only meant for Beat Saber you don't need to save the pose into a shape key, you can just put the avatar in the pose and export it. If you want the avatar for other games like VRChat you should create the shape keys.

Optimization
If you try to export the model through CATS plugin it might tell you that you should have max 4 textures if you use more (I don't know if this is a standard but VRChat SDK will show you an error if you have more materials than 4, my avatars with 14ish textures worked just fine but their performance was lower than when using just 1 texture. Anyway it's easier to work with less textures so I suggest you do this).
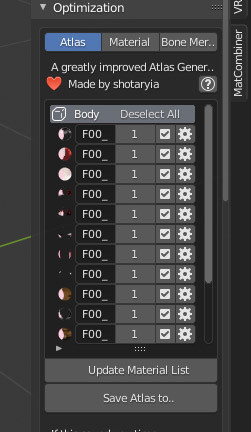
Under Optimization in the CATS plugin there you can atlas your materials if need be (another plugin needed). Under Material tab you can combine the same materials (which should have already happened during 'Fix Model') into one and convert them to png if need be. Under Atlas you can atlas all or just selected materials to one single texture. First you need to click on generate list and then you can select which textures to atlas. Then click on Save atlas and choose the location where to save it. It won't be part of the fbx you will be exporting so you will have to manually copy it to the Materials folder in your Unity project. Creating an atlas saves a lot of work in Unity where you have to set all shaders to Beat Saber ones and add the textures (note: if your model looks dim even with unlit shaders it is most probably because Unity defaults to gray color for base color - change it to white).
If you model has more triangles than 70 000 you should decimate your model. That can be found under Decimation. If your model exceeds the number of triangles you should do it before creating any shape keys. There are several options 'Safe' which won't affect any shape keys, 'Half' which will break some and 'Full' which will completely get rid of all shape keys. Custom allows you to decimate parts of your model. The optimal number of triangles should be below 32 000.
When you are done optimizing your avatar you can export it. When exporting in Blender and you want to keep the textures in the fxb file you need to set Path Mode to Copy and have the icon next to it be in 'Embed textures' state.
Unity
Make sure you use the correct Unity. I use 2019.4.18f1.
In order to be able to create avatars for Beat Saber you need to download a specific build of Unity. Install Unity Hub and create an account and choose a license. After that navigate to https://unity3d.com/get-unity/download/archive and download Unity 2019 4.18. via the Unity Hub.

Then download the avatar template project from https://github.com/nicoco007/BeatSaberCustomAvatars/releases/. Create Unity projects folder somewhere and copy the project there. In Unity Hub click on ADD and choose the folder with the project. Then you can click on the project and it will open (make sure that it opens in the correct Unity if you have more versions installed).
Then copy two libraries - DynamicBone.dll and FinalIK.dll from Beat_Saber_Data/Managed to Assets/Libraries of the project you just added.
Right-click in the Assets folder (or choose Asset->Import New Asset) and import your exported fbx via Import New Asset. Then click on your model in the Assets and check the Inspector.
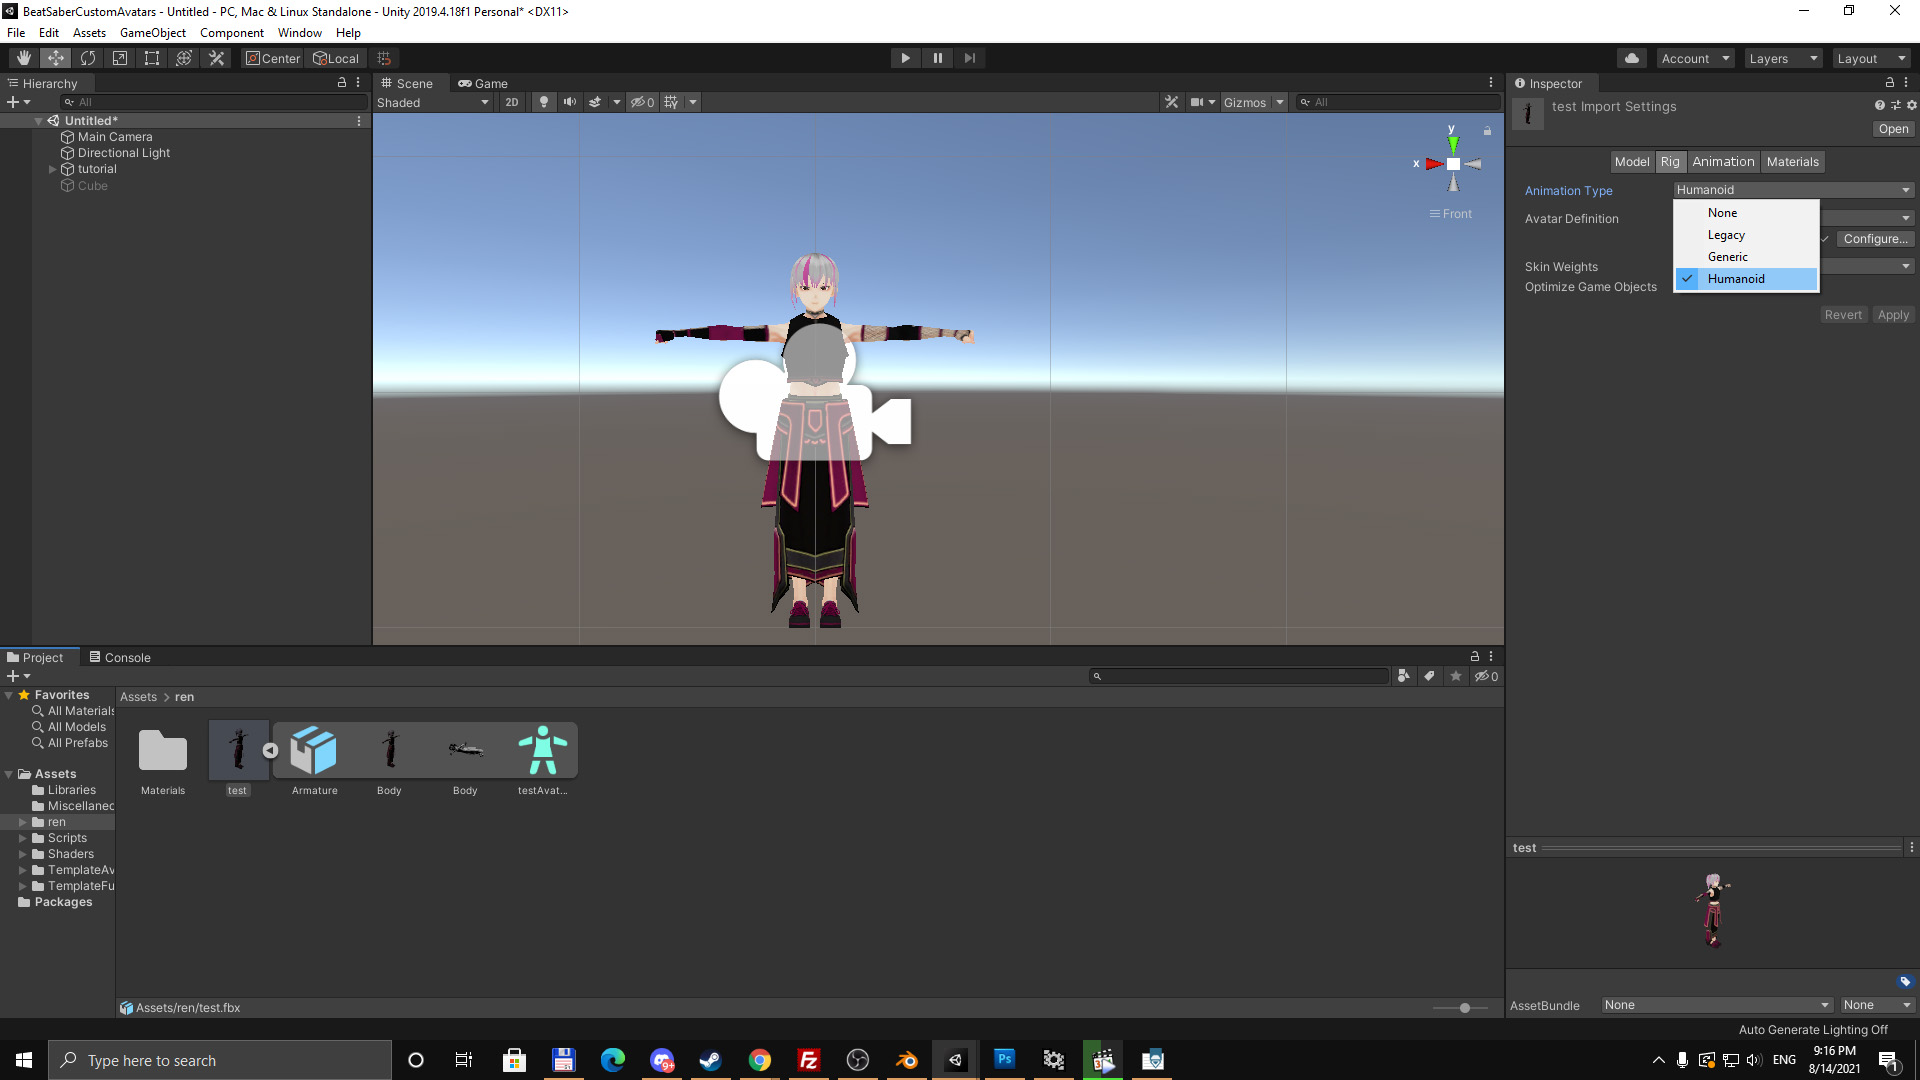
Click on a rig tab and change it from Generic to Humanoid. Keep the 'Create from this Avatar' and click on apply. It should be already configured, if you click on Configure you should see all the bones mapped correctly and showing green. If they are in red you'd have to manually drag the bones to the correct places (or try Automap from the Mapping options). It's also possible that some bones will be misplaced so delete those and assign them to the correct places. Unity will show you a red error in the console window and won't let you proceed until you fix this.
Then click on Materials. Here extract both materials and textures (if they are included in the fbx file). You can link your materials then (usually done automatically).
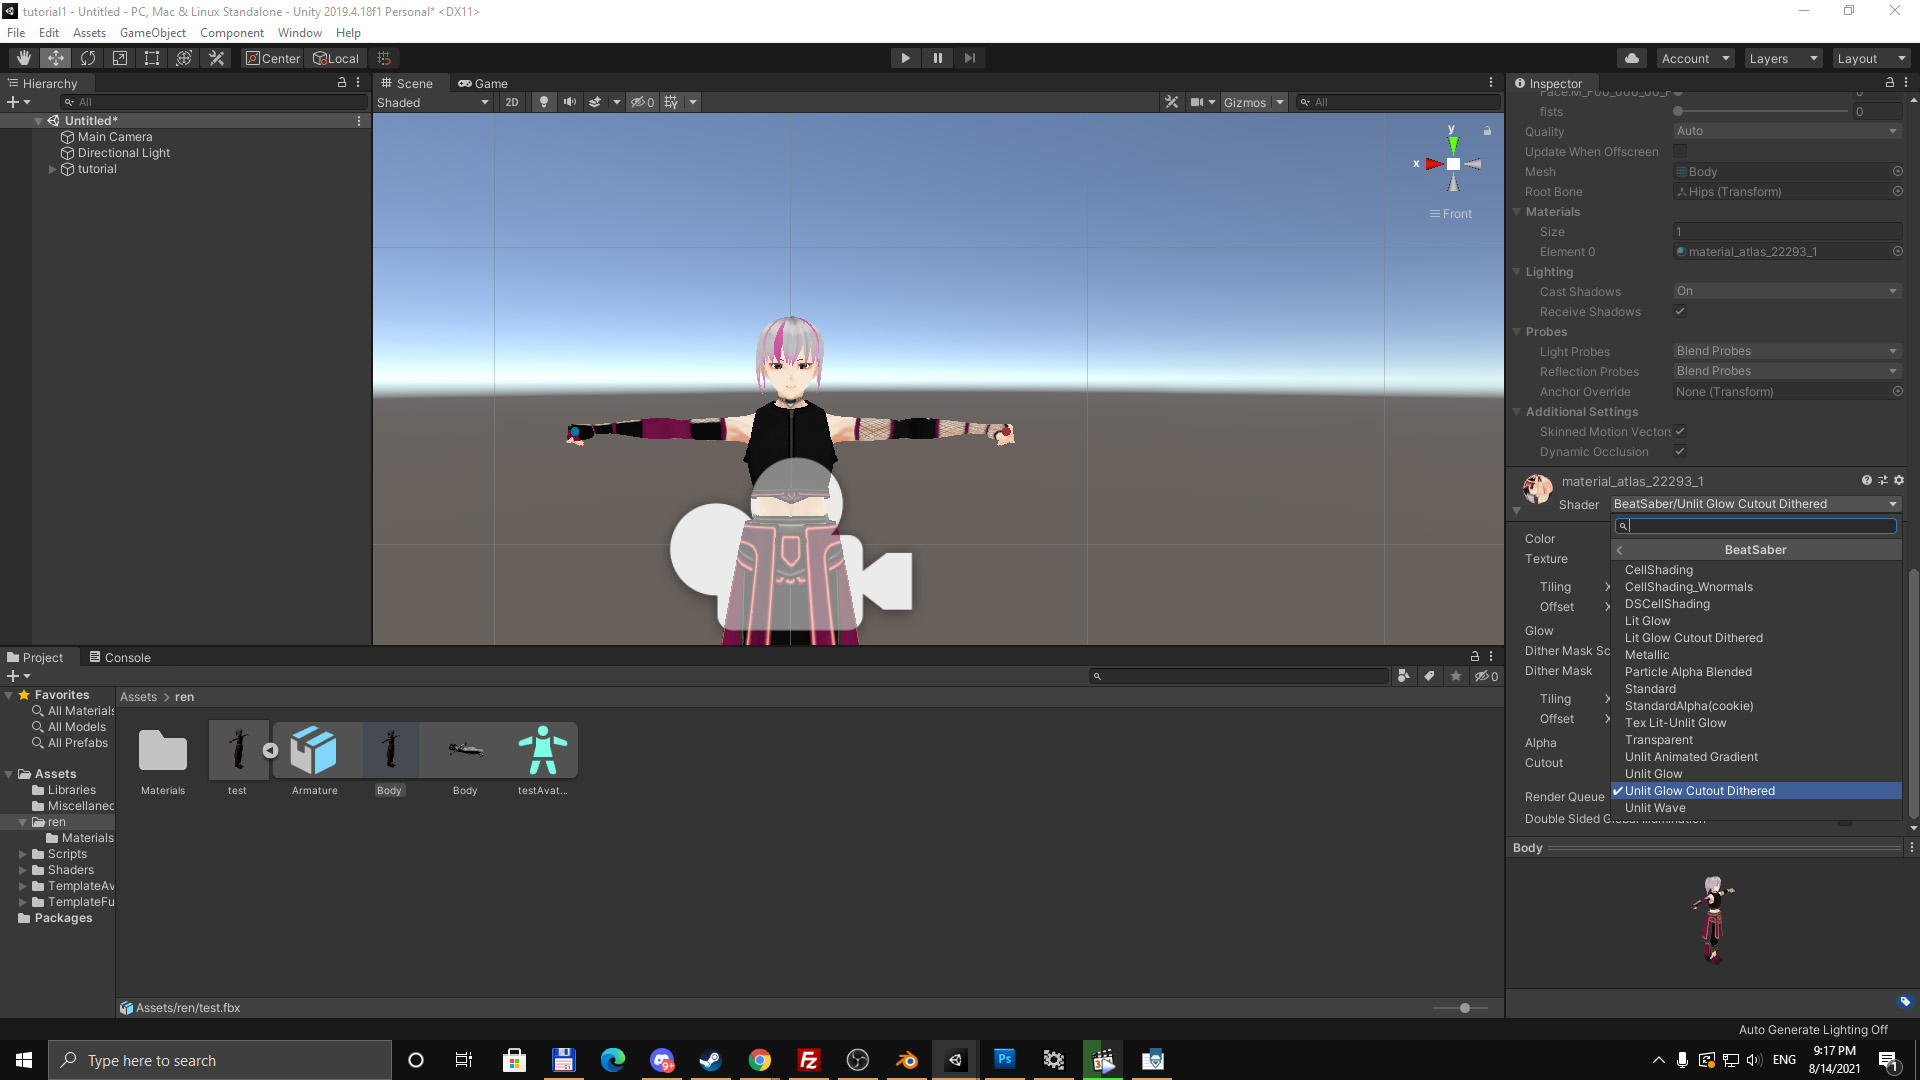
Click on the little arrow next to your model and it should show you the armature and body and whatever else is in the fbx file. Click on the mesh of the body. In the inspector tab if you scroll down you should see a list of materials. Here you will need to change the shaders to BeatSaber shaders otherwise your avatar will be just pure white in the game. Many of the Beat Saber shaders do not work. I use primarily the UnlitGlow shaders because I want my avatar to glow in the dark environment of Beat Saber. CellShading shaders work so you can play with those or download more Beat Saber shaders done by the community. For example the Complete Beat Saber shaders that are meant for Custom Sabers or Platforms still work great for avatars. I'll talk about the UnlitGlow shaders since I use these and are great to use to see if everything works as intended. There are two UnlitGlow shaders - UnlitGlow which is for textures without transparent parts and UnlitGlow Cutout Dithered for those that have transparent parts. If possible use the opaque shader since shaders with transparencies are more demanding.
After you change the shader your avatar will mostly tturn grey which is normal. You need to set it up. Unity defaults to grey if your model doesn't have a set base colors. Change the color to white (since that is what people usually work with). If the texture doesn't show you will need to load the texture. Note that if you didn't embed the textures you will have to copy them into Unity's Assets folder first (create a folder Materials there and put them there).
After this you can start the process of creating your game object. Create an empty game object (right click in the Hierarchy window) and set its position to 0,0,0. Rename it to the model's name. In my case aurora. Then if you don't need full body tracking add 4 empty game objects in the game object you created. Name them Head, Body, LeftHand, RightHand. (FBT needs Pelvis, LeftLeg, RightLeg in addition to these).
Note that the names of the game objects have to be exact. If you don't name them properly you will probably run into an error stating '[name of the game object] is missing'.
Create a cube and set its height to a human height. In my case I set it to 1.8. Set the position so the bottom of the cube is at 0,0,0. That means you'd have to position it to y=0.9 in my case. Drag your model into the scene and position it to 0,0,0. Then scale it to desired height. In my case it's anything between 1.6 and 1.8. My model's size is 1.6 but I scaled it a little bit (to 1.07) - my flatmate is higher than me. You can delete or hide the cube (hiding is done by unchecking a box in front of its name in the inspector tab).

You will need to place and rotate the created objects. Body object can stay where it is. Click on Head and move it to where your HMD would be. Somewhere around the eyes/nose with Z axis going forward, Y axis going upwards. Right and left hand objects should be slightly in front of your hands. With axis Z going forward (along the saber blade) and Y towards the wrist. Pelvis and feet trackers are placed and oriented depending on the trackers you use. For feet trackers it usually means that they are placed on your instep, with Z going upwards, Y going forward leaning down towards your toes. If your pelvis tracker is in front like mine, the Z axis goes forward, Y goes up. Note that for full body tracking working correctly you may need to edit your rig first so the bones are at correct places and correctly rotated. (I had a hard time figuring out what is correct since the original rig I had didn't work, then I decided to see if I can make it work in VRChat. What works in VRChat works usually in Beat Saber. Often setting roll on bones to 0 fixes leg problems (if not you have to align the bones in Blender). In armature edit mode, click on a bone, select everything pressing A and press ALT+R)

Then drag your model in the Hierarchy window to your game object with its name. Now for each of your objects you need to find the corresponding bone and create an empty game object there. You then drag the object into the respective object you created before. More specifically. You will navigate in your armature to head and create an empty object there. You will drag this object into head and rename it to HeadTarget. You'll do the same for the remaining objects you have naming them LeftHandTarget, RightHandTarget, PelvisTarget, LeftLegTarget and RightLegTarget.
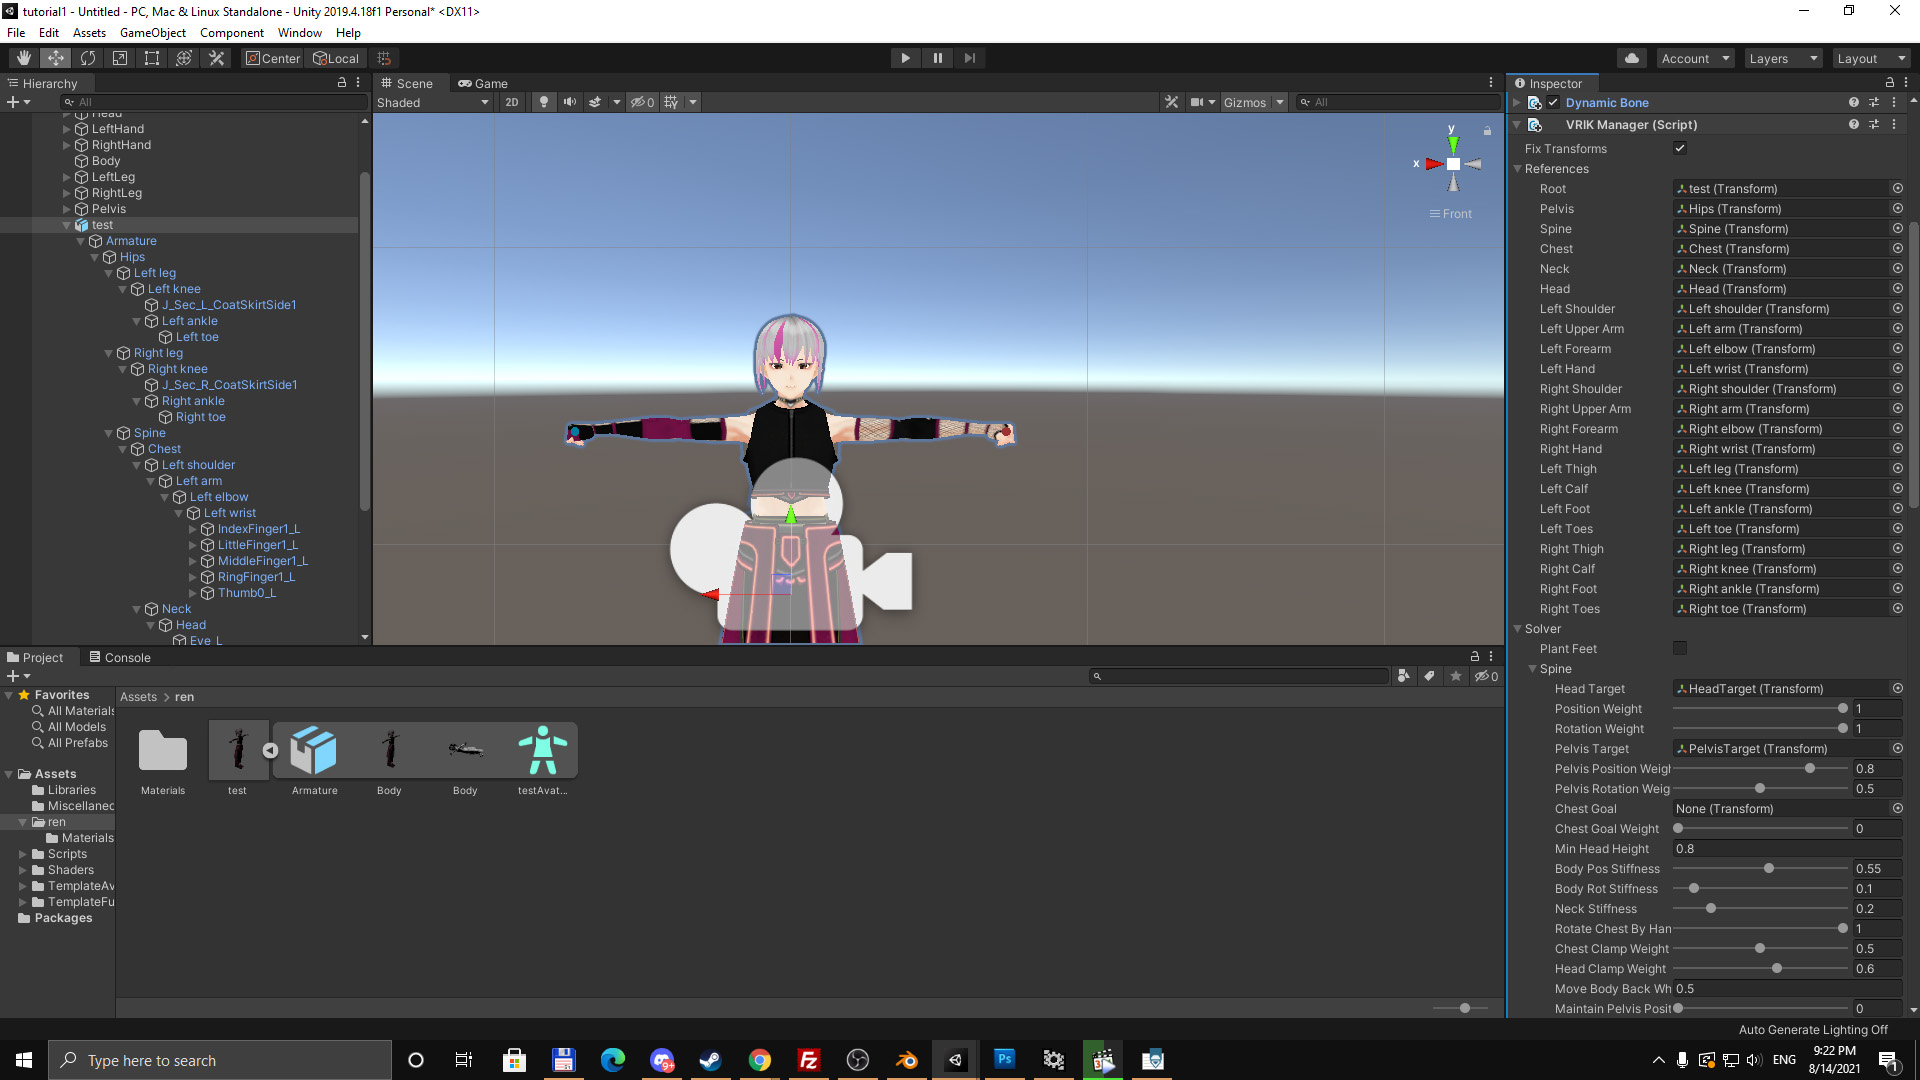
When you have all objects and targets in place you will need to add two components to your model. Click on the root of your model in the Hierarchy window and add VRIK Manager component. Then link the Targets in the VRIK Manager with the ones you created. You can either drag them there or choose them from a list after clicking on the dot next to the empty field. If you are creating an avatar for full body tracking uncheck 'Plant Feet' in and set Leg_Position Weight and Leg_Rotation Weight for each leg to some non-zero values close to 1 in the VRIK Manager.

Click on the root object and add Avatar Descriptor. Fill out the info in the descriptor. In order to get a thumbnail there you need to have a picture in your assets with the texture set to sprite (2d and UI) and then you can drag it into the Descriptor component.
At this point you can add animations or dynamic bones. When you have everything as you want it you can export your avatar.
All you need to do is click on Avatar Exporter and click Export. If you'd want to reexport the avatar into the same file name note that you can't. It won't rewrite the file so either delete the previous file or export with a different name. (If you don't see the exporter, click on Window and there you should see Avatar Exporter. So just click on that and it will show.)
Mods
In order to get your avatar in the game you need CustomAvatar plugin that can be downloaded from https://github.com/nicoco007/BeatSaberCustomAvatars/releases or installed directly from ModAssistant. You will need to copy your avatar into CustomAvatars folder in the Beat Saber folder. After that run Beat Saber and choose the Custom Avatar mod settings. There you can choose your avatar and see if it works. Resize the model so it fits your height or arm span otherwise it may not work properly. If you want to use your avatar in first person view your avatar should also have First Person Exclusion component added in Unity. There you set size to 1 and choose the element to exclude which would be the head. For this to work the head mesh needs to be separated from the body (you can do this in Blender in Edit mode. Select the head mesh, press P, click on Separate by selection).
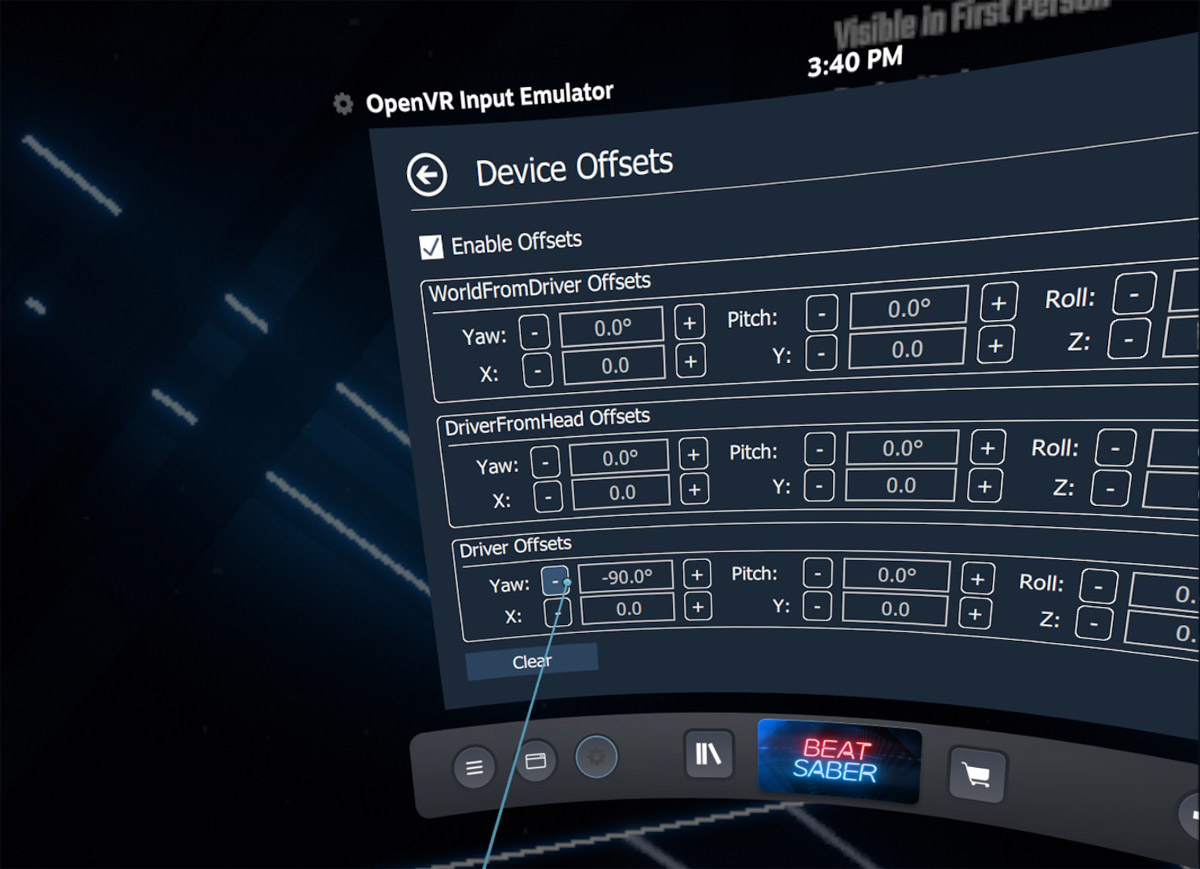
If you download an avatar that is ready for full body tracking and you have it activated you may see your avatar be twisted when you choose it. This is something that seems to happen many avatars you download and does not seem to get fixed with the plugin's calibration. It can be fixed via Open VR Input-Emulator that can be downloaded from its GitHub page - https://github.com/matzman666/OpenVR-InputEmulator/releases. Close SteamVR before installing OpenVRIE. After it is installed it can be accessed from the SteamVR dashboard. You need to click on a grayed out cogged wheel. In the OpenVRIE settings you will need to change the Device Offset of the hip tracker. It is possible that you may need to fix other offsets too. The avatars may not be properly set up for FBT (usually pitch for the feet trackers) or they are set for different trackers.
If you want to record or stream so people can view your avatar you can use CameraPlus mod or Camera2 that is available in ModAssistant. CameraPlus is operated from the Beat Saber window (right click the window to make CameraPlus show up) while Camera2 is operated from inside of the game.
Thanks the community for creating these mods and everything else that makes Beat Saber enjoyable for players and viewers!
Ren (stsungjp @ twitter), stsung#1564 on Discord
S'Tsung'S Blog: Beat Saber Guide - How To Create A Full Body Tracking Avatar For Custom Avatars 5.2 And Higher >>>>> Download Now
ReplyDelete>>>>> Download Full
S'Tsung'S Blog: Beat Saber Guide - How To Create A Full Body Tracking Avatar For Custom Avatars 5.2 And Higher >>>>> Download LINK
>>>>> Download Now
S'Tsung'S Blog: Beat Saber Guide - How To Create A Full Body Tracking Avatar For Custom Avatars 5.2 And Higher >>>>> Download Full
>>>>> Download LINK Nf