
Ever wondered how to make your Beat Saber videos more appealing to your viewers? If yes you might have searched for some videos of what is possible and you found videos of people being shown in the virtual reality. The question is, how is that even possible? Well, there are applications that allow it and today I'll talk about LIV.
LIV is an application that allows for mixed reality capture - meaning that you can put yourself from the real world into the virtual world and then you can either stream it or record via software like OBS or Xsplit. If you don't have the equipment for recording mixed reality you can use an avatar that can be put in the game where you normally stand. LIV can create virtual cameras that can record the avatar in motion. LIV can also be used to enhance first person view because the normal FPV is limited in view and also can make the viewer motion sick. The last feature that I didn't use so I can't comment on it is that you can use a game pad controlled camera while in game, or rather your friend would be controlling it and while you'll playing.
All of these features can make the viewer experience way better and it allows for a better connection between you and the audience. The application is free and is available on Steam. Currently, it only works with Steam titles.
I knew that mixed reality videos were a possibility but I expected that one really needs a green screen studio to record them. NX though told me about LIV and that it can use Kinect or iPhone XR for this without the use of a green screen. He offered to bring it to me so I could try it. I knew that setting that up would take ages but I wasn't ready for how tedious it ended up to be. The following text will talk about how to set up stream looking like the video above. I'll also tackle the difficulties I had to overcome.
For starters, here's the list of what I used in order to record these kind of videos.- SteamVR
- LIV
- Beat Saber on Steam
- Kinect
- Oculus Rift CV1
- PC - Ryzen 7, Titan X
- Open Broadcaster Software
- 2.4 m x 1.6 m space
The minimum requirements are i7 or AMD equivalent and GTX 1070. Note that OBS requires a good processor and GPU as well so running on this setup you may need to lower your resolution or quality settings in order to get it working. Beat Saber is not that demanding when it comes to it but OBS and LIV running at the same time can overload the GPU very fast.
LIV is free to download but you will notice that there is a watermark in the output. If you want to get rid of it head to LIV's Discord channel and fill in a form. They will send you a Steam Key to get rid of the watermark.
Since I played using Oculus software I had to install SteamVR. When launching a game via SteamVR I didn't need to do a room setup, it just worked but later on I found out that the settings were off. If you need to run room setup and you don't see it in the options of SteamVR, look for it under Library on Steam and run it from there (you can also find the executable file on your hard drive to run it).

Then I could download LIV. When you first launch LIV you will need to install a LIV SteamVR driver. You do that by clicking on the button Install in LIV. In order to install it you need to run SteamVR at least once and not having it running during installation. Then you need to restart LIV. Start SteamVR.
Then plug in and install your camera. And set it aside. After that install your preferred streaming software if you don't have it installed already. I use OBS so I will talk about that. I recommend creating a new scene in OBS and adding a Video Capture Device (using the camera you'll use for recording - in my case Kinect) Alternatively you can use the output view in LIV but it's more convenient to use OBS. You should see the camera feed in OBS and then you can find the right spot from which to record so you are whole in the scene. Note that you should have at least 1.6 to 2 m of space in front of the lens.
When you find the right spot click on 'Launch Compositor' in LIV. (Note that in the view of the camera there shouldn't be any shiny objects or anything that reflects light. You might need to use additional lightning sources as well.)

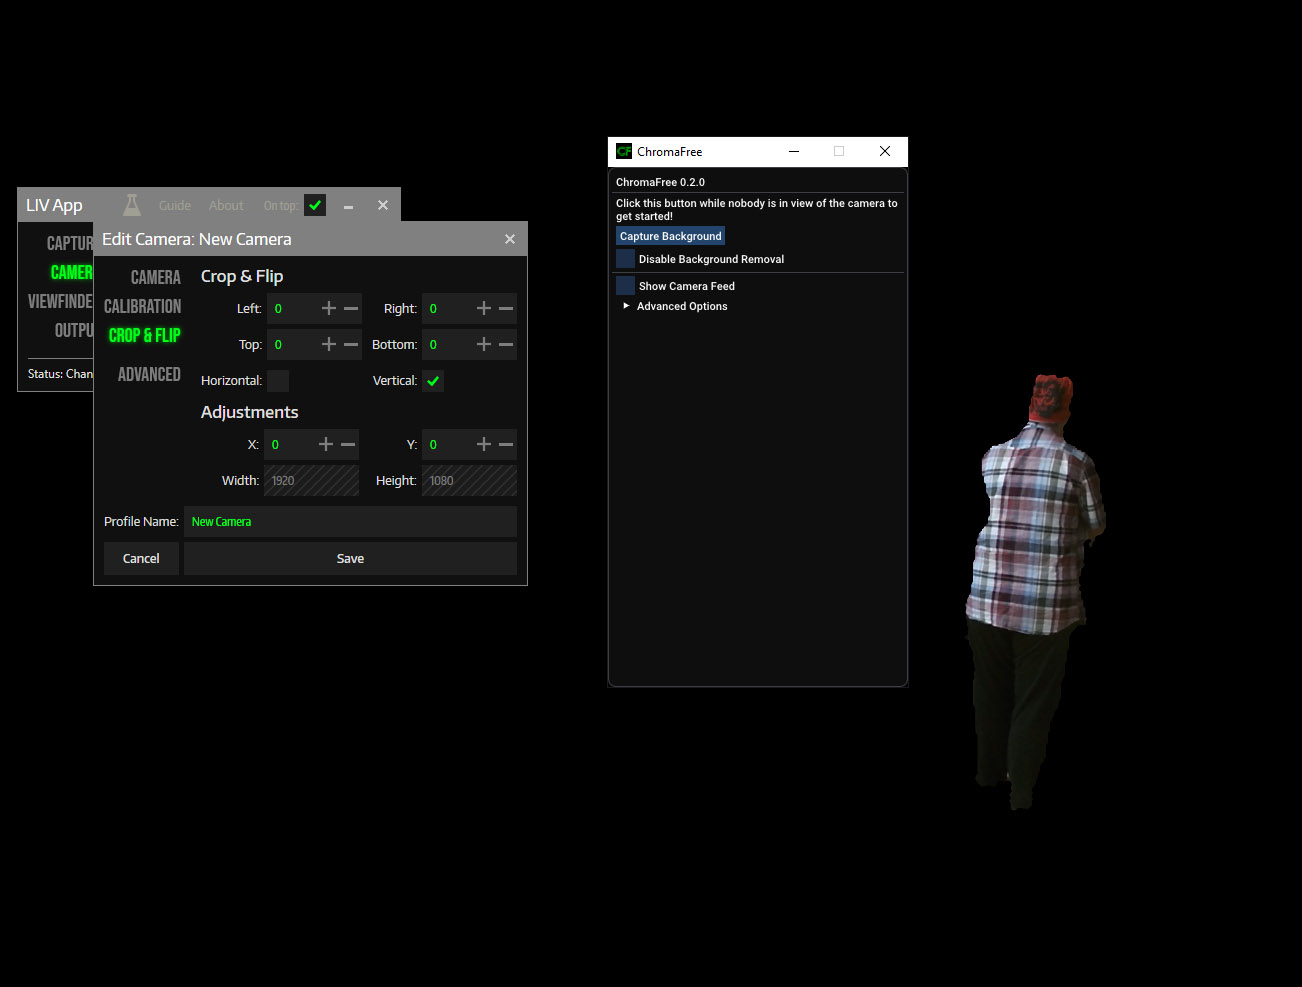
Kinect Camera/ChromaFree seems to have problem with black hair which is why I use the bandana to cover my hair
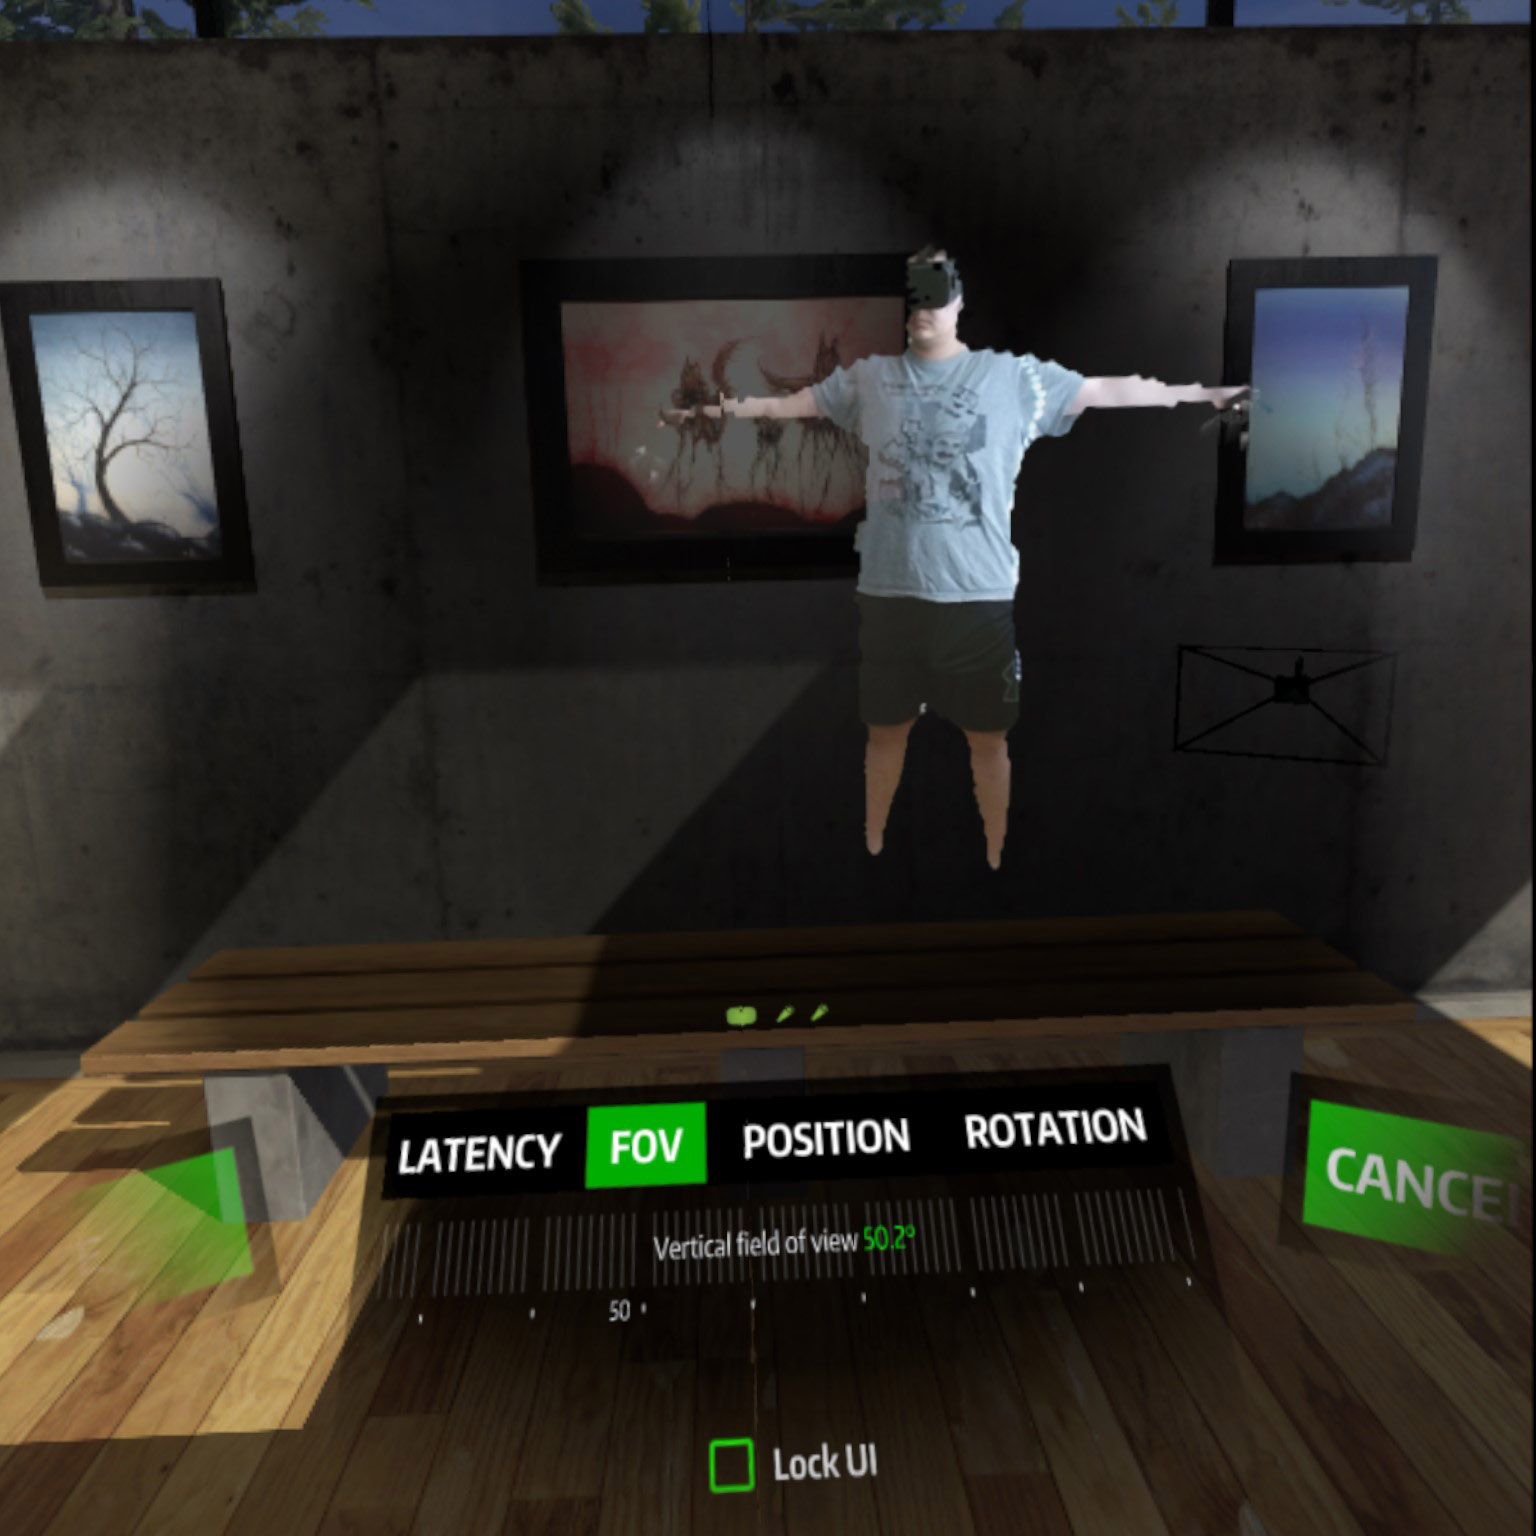
(You want the Output window shown when setting the camera so open that) Next click on the Edit button (second button). You'll see a new window. It has four options - Camera, Calibration, Crop & Flip, Advanced. If you see your camera output vertically flipped (it is a known bug) go to Crop & Flip and check Vertical. Then head to Calibration. The real fun will begin. Pick a Static tracker and click on Calibration. A VIVR application window will show and you have to press Start Calibration to start the process. The calibration itself takes place in virtual reality so put on your headset and grab your controllers.
Hit the Launch button and press the Trigger. In front of you, you should see a big red cross. That should be at the same place your camera lens is. So move right in front of it so the trigger on your touch controller is right in the middle of the cross and press it. After that a new, smaller cross will appear. Step further away from the camera until LIV shows a distance in green (you should reach the furthest area of your play area). Then align your trigger with the center of the red cross again (you should see that in front of you on the screen). Do the same for the last red cross. You should be as accurate as you can be.
In theory your virtual controllers should match the location of the real world ones. Most probably it won't be the case and you will have to fine tune. Note that I use a very limited space for recording and not ideal conditions for it either and my tuning is pretty way off. After you perform the three clicks come closer to stand in front of the lens of the camera. Hold one of you controllers in the middle of the frame and adjust the position of the camera using the X/Y/Z. The Z controls the depth and that will primarily be used to match the size of the virtual controllers with the real ones.
Then step back where you did those two red cross clicks and create a T-pose (arms stretched to the sides). Now you use Pitch to move controllers up or down and Yaw to move them right or left. Get one controller close to the real one as possible.
Then do the T-pose again and see how far or close they are. Adjust FOV to put them where they should be.
After this step close to the lens and do the same.
Then go in the middle and do the same. At this point you can use rotation to finally place the controllers where they should be.
Repeat these steps until you are satisfied (I gave up after 3 hours, you may be more lucky than me).
Now go back to Camera, there you should be able to see Device settings under the Mode. It will open ChromaFree window. Leave your prepared scene and click on Capture Background. The background should disappear from the scene and it should just show black instead. It should also show you if you walk into the camera view. Note that Kinect cameras struggle with black hair.
After your calibration is set you can save it and go to Capture. Choose the game you want to record and click on Sync and Launch. Now the game should load and you should see yourself in the output window.
In OBS, create a new scene and add a Window Capture targeting LIV output window. LIV output is video only so you will have to add an audio source from which Beat Saber is playing. In my case it comes out of Oculus Rift Virtual Audio Device. Since the game runs you should see that being shown in the correct track, so try each one by one if you have more devices you can record from. Then add anything else you may want to use. If you want to capture the FPV you can either capture the monitor view that may be cropped or use OpenVR OBS plugin to do so which captures the whole mirror surface in full resolution.
If you think you are done setting things up you are wrong. First I would advise to play a song and record it to see how the FOV actually looks like (no matter if you see other problems). Just do a test video. Then make a note of all problems you encounter.
So the first one may be that the floor doesn't align with your feet. If you look at my video you'll see that my ankles are under the virtual floor. Fixing this may be tricky. First if you weren't setting anything in SteamVR you can try to set floor in Oculus -> Device Settings under Set Floor Position. You will enter your height there and then stand on designated place and press the trigger twice. The sensors should pick up where the floor is. Relaunch everything, Sync and Launch and see if that helped. Next thing you can try making SteamVR control everything. You have to run room setup first (note that room setup will fail if you have OBS running). If that itself won't solve the problem go to Developer's Settings that are available from the SteamVR menu. Put your HMD on the ground in the middle of your play area and put a hand or foot in the headset to trigger the sensor. Click on Quick Calibration. Relaunch everything and Sync and Launch. If this still didn't help there is a workaround in the camera settings but note that your VR settings may be wrong and may need to be reset. If SteamVR messes things up big time, close it, delete the Chaperone Config file from the SteamVR directory ..Steam/Steammaps/Common/SteamVR and launch SteamVR again. You will have to do room setup again then. As for the workaround. In LIV, under Edit Camera and Crop & Flip, there is Adjustment. Move the Y higher or lower depending on whether you stand above or under the floor. After you set the height right you will have to go through the whole calibration process described above again.
The second problem might be that you don't see enough or you see too much in the camera view. That can be adjusted by using FOV Override under the Calibration tab in LIV. In my case I use 70 degrees. If you don't record the full body you shouldn't be touching this because the image will be cropped if the value is too high and you won't see much if it's going to be too low (the higher the FOV the higher load on your CPU so if it won't run smoothly try lower the FOV value).
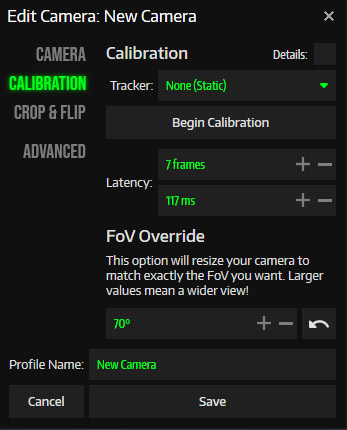
When you are satisfied there are two other things you can take care off. Audio and Video will both have a lag so you may want to set a delay for the VR capture. The VR video Latency should be set and you can input it in LIV under Calibration. For the Kinect camera it's probably around 7-9 frames. To find the value you can set NoFail in Beat Saber let a song play out and just swing your saber and follow your arm movement (or rather the other way round). For audio, you can calculate it after you figure out the video delay. The formula for it is audioLatencyAdjustment = (1000 / outputFPS) x frames. You get a value in ms and that should be added to your audio track in OBS. It can be set via Advanced Audio Options.

If you set both latency more or less right the sabers should follow your arm motion and the sound shouldn't be way too off. This also depends on how fast you move. With my test moves it worked quite ok but when I tried playing songs on Expert, Faster song and Expert+ I found out that my settings are not quite right so you may find yourself playing with that for a while as well.
After you are done setting everything you may want to enable Viewfinder. This will show the output video in virtual reality where your camera lens is. So if you look that way you will know your viewers will be able to see your face (and you will see the output).
OBS Settings
These settings should be fine when using GTX 1070
I didn't speak about Output settings because that is something you will have to find out for yourself as it will depend on your system configuration. I will now write about OBS settings a bit so you have an idea what can work if you have GTX 1070 or better graphics card.
My upload speed is 10Mbps which means that I can normally stream at 1080p60 at 6000 Kbps Bitrate. Ryzen 7 and Titan X are very capable of it but when it comes to high motion and two to three very demanding inputs using the GPU it may not work out and it actually didn't for me. For that I had to lower the resolution to 1280x720 (I set that both in LIV and OBS so it wouldn't try to rescale by some accident or anything).
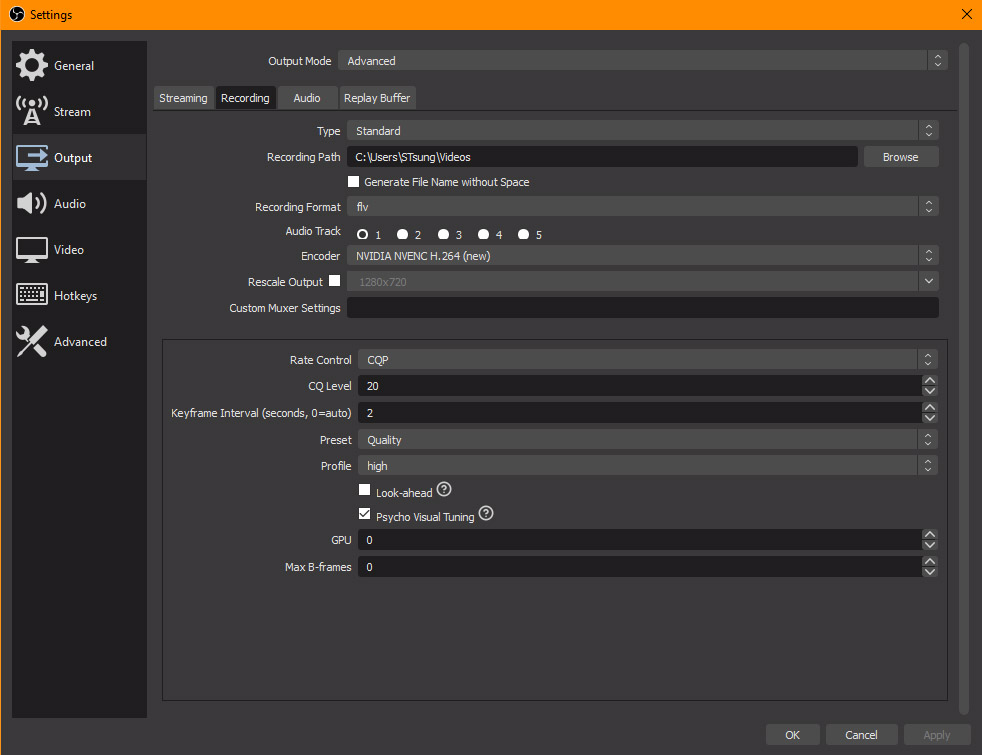
If you don't have a version higher than OBS 23.0 and you have a newer card download it. It uses new NVENC (which may not perform well if you have GTX 1070) which uses the GPU in some more efficient way. For streaming I use (if not using an avatar, use NVENC when using an avatar) - Output of 1280x720, 60 FPS, x264 encoder, CBR 6000 bitrate (twitch limits it for me to 3500), 0 keyframe interval, CPU usage Very Fast, Profile High. For recording I use new NVENC, CQP 16, Keyframe Interval 2, Preset Max Quality (2-pass encoding), Profile High, Psycho Visual Tuning turned on, Look Ahead turned off, GPU 0, Max B-Frames 0.
If your dedicated video memory is lower you can use 1-pass encoding (Quality) and lower the quality to something between CQP 20-23. If your graphics card is not good enough you'll have to be cutting on resolution and FPS but if it comes down to that your computer is most probably not VR ready so you shouldn't probably run into that problem.

Getting your settings in OBS right is not the only thing that can clog the performance. There are few things you can do when it comes to OBS. First turn Game Mode On in Windows if you haven't already. Next see if Game DVR is running. That can be found under Gaming Settings. Turn Game DVR off - Turn off the Game Bar and then go to Captures and turn off Background Recording. If you can't find these settings you can use local group policy editor to disable it or disable it in RegEdit.
Set OBS to run as Admin. Find the OBS executable, right click to go to Properties ->Compatibility Settings, check Run this program as Administrator.

If you still have some problems launch Beat Saber and go to Player settings. Check Reduce Debris and check Static Lights. If this still won't help then you may need to change the graphics settings of Beat Saber (lowering the rendering and antialiasing values) either in the game itself or in SteamVR (lowering the rendering resolution).
This sums up the process of what you need to do in order to stream and record a mixed reality output. If you don't have access to Kinect or iPhone XR you can use any webcam recognized by LIV. I used PS3 Eye Camera to try it out at first. In this case you need a green screen or another kind of one color screen. The process for setting that up is the say with the exception that it won't launch ChromaFree but another window that is used for keying where you can get rid of the background as well. Note that no matter what camera you use the background unless you have the very same light conditions and green screen conditions will have to be reset with each launch of LIV. Kinect camera will also vertically flip upon each LIV launch. If you change any setting and change it back it will revert to the settings you set previously.
If you don't have access to a camera you can always use a virtual camera and use an avatar instead. There are already some avatars in the LIV app but you can download more, for example from https://bsaber.com/avatars/ or https://modelsaber.com/Avatars/?pc. Or you can create some in VRoid Studio for example. If you want to use an avatar, in LIV, you should click on add camera button. There you pick Avatar. A new VIVR Avatar window will open. In that you can drop avatar files. Then you can Sync and Launch and pick an Avatar in game (through the green LIV dot somewhere on the floor). There you will have to do a T-pose to overlay it with you and you are set. You may need to change your camera settings but otherwise no more tedious calibration is needed (all the problems with floor and such apply here too though).
Hopefully this post will help you set up your stream
Thank you for reading
S'Tsung (stsungjp @ Twitter)
No comments:
Post a Comment